


The PhotoViewer (DVR-640H-AV)
11
120
En
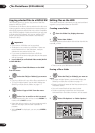
2 Select ‘File Options’ or ‘Folder Options’.
3 Select ‘Lock’ or ‘Lock Folder Contents’.
Locked files are shown with a padlock icon next to them.
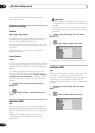
Printing files
Connecting a PictBridge-compatible printer to the USB
port will enable you to print out picture files
1
stored on
the HDD, or directly from a digital camera.
Make sure that the printer (and your digital camera if you
are using that as a source) is connected to the recorder
before starting.
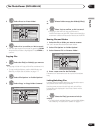
1 Select the file(s) you want to print.
• To print multiple folders, use the Multi-Mode; see
Selecting multiple files or folders on page 117.
2 Select ‘Print’ from the menu.
It takes a moment for the recorder to communicate with
the printer. During this time you can press ENTER to
cancel the print.
3 Select ‘Start’ to confirm, or ‘Cancel’ to
cancel.
• Once printing has started, you can cancel by
pressing ENTER.
Tip
• Paper size and layout can be set; the options
available depend on your printer—check the printer
manual for details.
Note
1 Picture files should be standard DCF format. Non-standard files may not print properly.
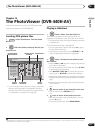
ENTER
ENTER
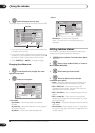
PhotoViewer
1/2 1/3
001. 12/12 TUE
002. 12/13 WED
003. 12/14 THU
004. 12/15 FRI
005. 12/16 SAT
006. 12/17 SUN
007. 12/18 MON
008. 12/19 TUE
1
4
7
2
5
8
3
6
9
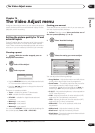
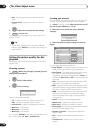
File
Date/Time
Chair No. 2
24/01/2006 10:00AM
1920
x
1440
HDD
Size
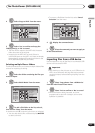
Press ENTER to display the menu.
Press RETURN to go back to folder selection.
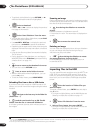
Start Slideshow
File Options
Print
Copy to DVD
Multi-Mode
Cancel
Erase
Copy
Rename File
Lock
Cancel
ENTER
ENTER
PhotoViewer
1/2 1/3
001. 12/12 TUE
002. 12/13 WED
003. 12/14 THU
004. 12/15 FRI
005. 12/16 SAT
006. 12/17 SUN
007. 12/18 MON
008. 12/19 TUE
1
4
7
2
5
8
3
6
9
File
Date/Time
Chair No. 2
24/01/2006 10:00AM
1920
x
1440
HDD
Size
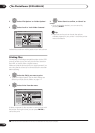
Press ENTER to display the menu.
Press RETURN to go back to folder selection.
Start Slideshow
File Options
Print
Copy to DVD
Multi-Mode
Cancel
ENTER