


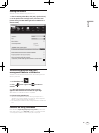
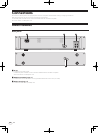
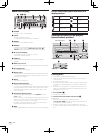

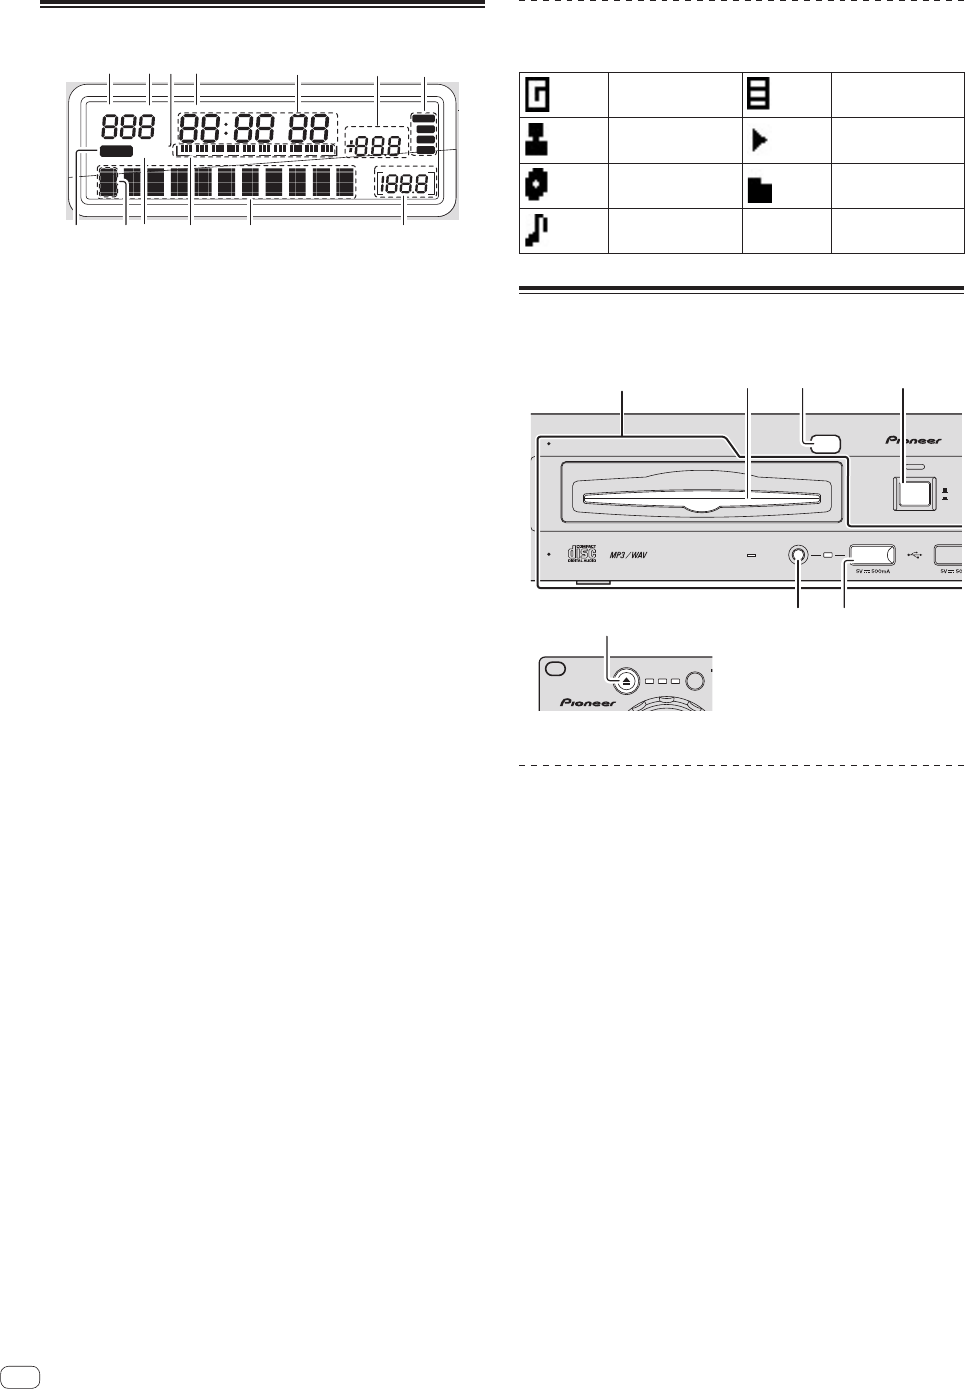
Main unit display
E
FOLDER TRACK REMAIN
M
REPEAT
RELAY
SF
TEMPO
BPM
%
WIDE
±16
±10
±6
A.CUE
1
3
8
2 4
5
6
9a b c
7
d
1 FOLDER
The folder number is displayed here.
2 TRACK
This displays the track number.
It is not possible to display more than 1 000 tracks.
3 REPEAT
Lights when in the Repeat Play mode.
4 REMAIN
The display can be switched between the elapsed time and the
remaining time by pressing [TIME MODE (AUTO CUE)] f.
[REMAIN] lights when the display is set to the remaining time.
5 M, S, F (time display)
“M” indicates minutes, “S” seconds, “F” frames.
There are 75 frames to a second.
6 TEMPO %
This indicates the percentage by which the playing speed is
changed.
7 WIDE, ±16, ±10, ±6
This indicates the range by which the playing speed can be adjusted.
8 A. CUE (page 16)
This lights when auto cue is set.
9 Display icons
The icon of the currently selected category is displayed here. For the
icons that are displayed, see List of icons displayed on the main unit
display section on page 14.
a RELAY
This lights during relay play.
b Playing address display
The track is displayed as a bar graph.
Turns off from the left side when the remaining time is displayed. The
entire graph flashes slowly when the remaining track time is under
30 seconds, then flashes quickly when the remaining track time is
under 15 seconds.
c Information display section
The track information is displayed with the [BROWSE] display or
[INFO] display.
Up to 11 characters can be displayed. The displayable characters are
letters (A to Z), certain Latin characters, numbers 0 to 9 and certain
symbols. For other characters, “?” is displayed.
For details on how to display the track information, see Displaying
track information (browse section) on page 17.
d BPM
Displays BPM (Beats Per Minute) of the track currently being played.
List of icons displayed on the main unit
display section
Genre Playlist
Artist Playing
Album Folder
Track/file name — —
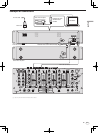
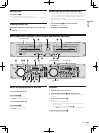
Setting the source to be played
(source select section)
EJECT
DISC 1
OFF
ON
USB 1
USB STOP
POWER
USB
EJECT
SOURCE
SELECT
CD
1
USB
12
45
3 12
2
Source select section
Control unit
Drive unit
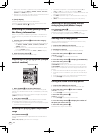
Loading discs
! Set the disc with the printed side facing up.
! Insert the disc horizontally into the disc insertion slot in the main
unit’s front panel.
! Do not load more than 1 disc.
! Do not force discs into the disc insertion slot when this unit’s power
is off. Doing so could damage the disc and lead to malfunction of
this unit.
! When the disc is being drawn in or ejected, do not apply any force
to the disc in the direction opposite its movement. Doing so could
damage the disc or this unit.
1 Press [POWER] 1.
Turn on the power of this unit.
2 Insert the disc into the disc insertion slot 3.
Playback starts.
! When auto cue is turned on, playback starts when
[PLAY/PAUSEf] 8 is pressed. For details on the auto cue func-
tion, see Setting auto cue on page 16.
! When a disc containing music files recorded with a hierarchical
structure is loaded, playback starts from the tracks in the uppermost
layer.
14
En