


Pausing
During playback, press [PLAY/PAUSEf] 8.
! Playback resumes when [PLAY/PAUSEf] is pressed again.
Resuming playback from the position playing
just before the disc was ejected (Resume)
After ejecting the disc, immediately reload that same
disc into this unit.
! The resume function only works when the same disc is ejected then
reloaded before loading another disc.
! The resume function does not work for USB devices.
Forward and reverse scanning
Press [SEARCH m, n] 7.
Press [n] to scan in the forward direction.
Press [m] to scan in the reverse direction.
Setting Cue
1 During playback, press [PLAY/PAUSEf] 8.
Playback is paused.
2 Press [CUE] 9.
The point at which the track is paused is set as the cue point.
The [PLAY/PAUSEf] indicator flashes and the [CUE] indicator lights.
No sound is output at this time.
! When a new cue point is set, the previously set cue point is canceled.
Adjusting the cue point position
1 While paused at the cue point, press [SEARCH m,
n] 7.
The [PLAY/PAUSEf] and [CUE] indicators flash.
2 Press [SEARCH m, n] 7.
The cue point can be fine-adjusted in units of single frames.
! The same operation is possible using the jog dial.
3 Press [CUE] 9.
The position at which the button was pressed is set as the new cue point.
! When a new cue point is set, the previously set cue point is canceled.
Returning to Cue Point (Back Cue)
During playback, press [CUE] 9.
The set immediately returns to the currently set cue point and pauses.
! When [PLAY/PAUSEf] 8 is pressed, playback starts from the
cue point.
Checking Cue Point (Cue Point Sampler)
After returning to the cue point, press and hold in [CUE] 9.
Playback starts from the set cue point. Playback continues while the
button is held in.
Setting Cue Point during playback (Real
Time Cue)
During playback, press [LOOP IN/CUE (HOT LOOP)] c.
The point at which the button was pressed is set as the cue point.
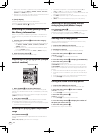
Setting auto cue
When a track is loaded or cued to the beginning, the silent section at the
beginning of the track is skipped and the cue point is automatically set
to the point directly before the sound starts.
Press [TIME MODE (AUTO CUE)] f for over 1 seconds.
Auto cue is set to on.
[A. CUE] lights on the main unit display.
! When [TIME MODE (AUTO CUE)] is pressed again for at least 1
second, auto cue is set to off.
Changing the auto cue level
The acoustic pressure level identified as a silent section with the auto
cue function can be selected from eight levels.
–36 dB, –42 dB, –48 dB, –54 dB, –60 dB, –66 dB, –72 dB and –78 dB
! The auto cue level setting remains in the memory, even when the
power is turned off.
! The auto cue level can be changed using one of the procedures
described below.
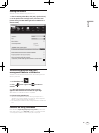
1 Press [DISPLAY (UTILITY)] g for over 1 second.
The [UTILITY] screen is displayed.
2 Turn rotary selector i then press it.
Select [A. CUE LEVEL].
3 Turn rotary selector i then press it.
The auto cue level setting changes.
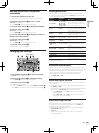
Operating the jog dial
! Do not place objects on the top of the jog dial or apply strong forces
to it. Also do not let drinks or other liquids get inside the product.
These actions may result in malfunction.
Switching the jog dial mode
Press [JOG MODE] a.
The mode switches between VINYL and CDJ each time the button is
pressed.
When the VINYL or CDJ mode is selected, the respective indicator lights.
— VINYL mode: When the top of the jog dial is pressed during play-
back, playback stops, and when the jog dial is spun at this time
sound is produced according to the direction in which the jog
dial is spun.
— CDJ mode: Playback does not stop even when the top of the
jog dial is pressed. Such operations as scratching cannot be
performed.
Scratch
1 Press [JOG MODE] a.
Set the jog mode to VINYL.
2 During playback, press the top of the jog dial b.
Playback stops.
16
En