


10
Setup and Connections
Projection TV Only.
If the picture appears to have a double or
triple image or if you notice rings or halos
around objects, you may have to adjust the
color convergence. Details can be found
under the Screen menu heading in the
Features and Menus section of this manual.
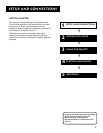
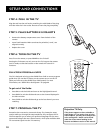
Step 4: Plug in the TV
Plug the end into the wall outlet, matching the wide blade of the plug
with the wide slot in the outlet. Be sure to insert the plug completely.
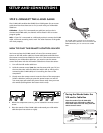
Step 5: Place Batteries in Remote
• Remove the battery compartment cover from the back of the
remote.
• Insert fresh batteries. Make sure that the polarities (+ and -) are
aligned correctly.
• Replace the cover.
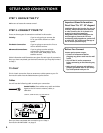
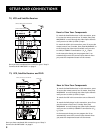
Step 6: Turn on the TV
Press TV on the remote, or press POWER on the TV itself.
Pressing the TV button not only turns on the TV, but puts the remote
into TV mode, so that the buttons on the remote will control TV
functions.
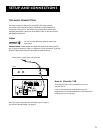
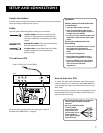
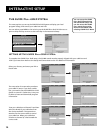
On-Screen Program Guide
The TV is designed to bring up the GUIDE Plus+ Gold on-screen program
guide when you use the TV button on the remote to turn on the TV
(after you have set up the GUIDE Plus+ Gold System). For more
information, see “GUIDE Plus+ Gold System” on page 44.
To get out of the Guide:
• Press OK to exit the Guide and tune to the highlighted channel.
• Press GUIDE to exit the Guide and tune to the channel displayed in
the View window.
• Press CLEAR to exit the Guide and go to the last channel you were
watching.
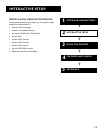
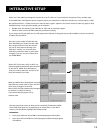
Step 7: Program the TV
Proceed to the next section, Interactive Setup. The interactive setup
routine walks you through the steps needed to fully configure the TV.
The first steps ask you to select your preferred language for the menu
system and to begin the auto channel search, which puts available cable
TV or antenna signals into the TV’s memory.
TV
TV
ON OFF
AUX
DVD
SAT•CABLE
SOUND
GO BACK
C
H
+
C
H
-
V
O
L
V
O
L
SKIPMUTE
INFO
MENU
OK
CLEAR
GUIDE
VCR1
VCR2