


Your New Wide TV
10
• For replacement, you will need a 5.91 Inches-long Phillips screwdriver and a pair of gloves.
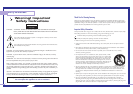
Replacing the Lamp
•Why do I need to replace the lamp?
The lamp used in a projection TV has a limited lifespan. For the best screen quality it needs to be
replaced periodically.
After replacing the lamp, the screen quality will be bright and clear as new.
•When do I need to replace it?
It should be replaced when the screen becomes darker, less clear or when all three LEDs on the front
(Timer, Lamp, & Temp.) are flashing.
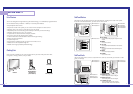
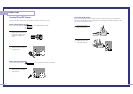
• Check before lamp replacement
1. The lamp must be the same code number and type.
2. The lamp type is indicated on the right side of the TV. It is also indicated on the lamp case.
3. After checking the code number for the lamp, give the code number to the store where you
purchased the TV or to a Samsung Service center.
•Caution
1. Replace with the correct code numbered lamp to avoid damage to the TV.
2. Turn the power off and wait for 30 minutes before replacing the lamp as it will be hot.
3. Do not touch the glass part of the lamp with your bare hands nor insert any foreign object inside
the cover as it may cause poor screen quality, electric shock or fire.
4. Do not place the old lamp near flammable objects or within the reach of children.
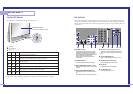
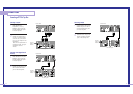
… HLN437W1/HLN507W1
HLN617W1/HLN4365W1
HLN5065W1
… HLN467W1/HLN567W1
… HLN437W1/HLN507W1
HLN617W1/HLN4365W1
HLN5065W1
… HLN467W1/HLN567W1
NOTES
• Be sure the replacement Lamp is the same type.
• After replacing the lamp, align the lamp cover with the groove and secure the screw.
• The TV will not turn on if the lamp cover is not correctly closed (as this will activate the
protective circuit).
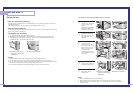
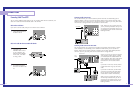
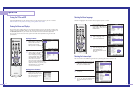
1
Unplug TV, then use a
screwdriver to remove the
screw as shown in the
picture.
(HLN467W1/HLN567W1:
Remove the rubber cap
and unscrew the screw.)
2
Remove the Lamp cover.
(HLN467W1/HLN567W1:
Exert a bit of force to the
right and pull for easy
opening.)
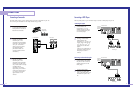
3
Use a screwdriver to
remove the screws
securing the Lamp. There
are 2 screws: one on the
left and one on the right.
When the screws have
been completely
unfastened, they will still
be connected to the body
of the Lamp.
4
Separate the Lamp from
the engine by holding the
handle and pulling it out.
5
To reinstall the Lamp,
follow these steps in
reverse order.
11