


19
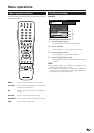
Menu operations
HDMI Setup
HDMI (High-Definition Multimedia Interface) terminal
selection.
1 To watch an HDMI equipment image, select
“EXT5” or “EXT6” (the terminal which you are
using) from “INPUT SOURCE” menu using b
on the remote control unit or TV.
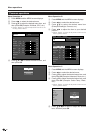
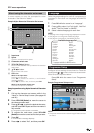
2 Press MENU and the MENU screen displays.
3 Press c/d to select “Option”.
4 Press a/b to select “HDMI Setup”, and then
press OK.
• “HDMI Setup” is displayed only when “EXT5” or
“EXT6” is selected from the INPUT SOURCE menu.
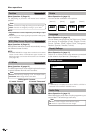
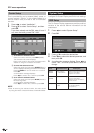
MENU
[
Option
...
HDMI Setup
]
Option
Audio Only
DNR
HDMI Setup
Quick Shoot
[On]
[Off]
Demo
5 Press a/b to select the desired item, and then
press OK.
6 Press a/b/c/d to select the desired setting, and
then press OK.
DNR (Digital Noise Reduction)
Menu Operation: A (page 12)
Produce a clearer image. (Off, High, Low)
Selectable items
RGB/YCbCr 4:4:4/
YCbCr 4:2:2
ITU601/ITU709
Normal/
Enhanced
Disable/Enable
Digital/Analogue
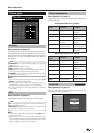
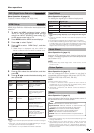
HDMI Setup
items
Signal
Type*
Colour
Matrix*
Dynamic
Range*
Auto View
Audio
Select**
Description
Select the video signal
type from the HDMI
terminal.
Select the internal colour
space conversion method
when an RGB signal is
input.
Select the signal amplitude
range. Usually, select
“Normal”.
Set whether or not to use
WIDE MODE based on
signal recognition,
including an HDMI signal.
Select “Digital” for audio
signal via the HDMI
terminal. Select “Analogue”
for audio signal via the
AUDIO jack.
NOTE
• Refer to your external equipment operation manual for the signal
type.
• Items with * may be greyed out (with 4) depending on the type
of signal input from the external equipment.
• Item marked ** is only available when EXT5 is selected.
Colour System
Menu Operation: A (page 12)
You can change the colour system to one that is
compatible with the image on the screen. (AUTO, PAL,
SECAM, NTSC3.58, NTSC4.43, PAL-60)
NOTE
• Factory preset value is “AUTO”.
• If “AUTO” is selected, colour system for each channel is
automatically set. If an image does not display clearly, select
another colour system (e.g. PAL, SECAM).
• “NTSC3.58”, “NTSC4.43” and “PAL-60” cannot be selected in
TV tuner mode.
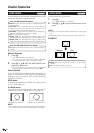
Quick Shoot
Menu Operation: A (page 12)
Improve LCD response when viewing fast-moving
images. The effect is greater at low room temperatures
(at or below 15˚C).
NOTE
• Quick Shoot may cause image noise. If this occurs, set the
function to “Off”.
Input Select
Menu Operation: A (page 12)
For setting the signal type of external equipment.
NOTE
• If no (colour) image displays, try to change the other signal
type.
• Check the operation manual of the external equipment for the
signal type.
• TV, EXT3, EXT5 and EXT6 are not displayed in Input Select.
• If both CVBS and RGB signals are input to EXT 1 or EXT 2 using
a SCART cable, the TV may output an RGB signal even though
you have designated CVBS for the respective terminal. This
happens due to the setting of your external equipment.
Demo
Menu Operation: C (page 12)
When activated, this function demonstrates some of
the functions of the TV on the screen.
Demo: Sets whether to activate the function.
Input Source: Selects whether to demonstrate all
functions of connected terminals or skip some.
Teletext: Sets whether to demonstrate Teletext.
Freeze: Sets whether to demonstrate Freeze.
Menu: Sets whether to demonstrate Menu.
Interval: Sets the interval between the presentations.
NOTE
• Some demonstrations may not be presented depending on the
settings made above.
• After switching on this demo function, it takes 70 seconds
approximately, before the TV-set starts the demo show. The
selected functions are shown in a self-repeating sequence.
Return to normal television-mode is possible only by deactivating
the demo-function.
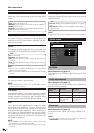
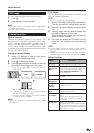
AV only
TV/AV only
TV/AV only
TV/DTV/AV only
Input source Signal type
EXT 1 Y/C, CVBS, RGB
EXT 2
Y/C, CVBS, RGB
EXT 4 PC (RGB), COMPONENT (Y, PB, PR)
Item
EXT 3 AUTO