


16
Picture Adjustments
Adjust the picture to your preference with the following
picture settings.
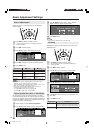
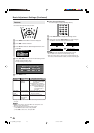
Press MENU to display the Menu screen.
• The Picture Menu screen can be displayed directly by
pressing the Red.
Press \/| to select “Picture”.
Press '/" to select a specific adjustment item.
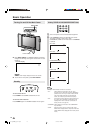
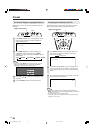
Menu
[
Picture(TV)
]
Contrast [ 3Contrast [ 3 ] ] +6 +6
Brightness [ Brightness [ ] -3] -3 +3 +3
Colour [ Colour [ ] -3] -3 +3 +3
Tint [ Tint [ ] -3] -3 +3 +3
Sharpness [ Sharpness [ ] -1 +1
Colour system
Advanced
Reset
Picture
0 0
0
0
0
0
0
0
0
0
0
0
0
00
Press \/| to adjust the item to your desired position.
Press MENU to exit.
NOTE
• Select “Colour system” and press OK to select “Auto”, “PAL”,
“SECAM”, “N358”, “N443” or “PAL60”. See below.
• Select “Advanced” and press OK to set “I/P Setup”, “DNR”, “Film
mode” or “Cool climate”. See pages 16 and 17.
• When setting all adjustments (Except “Colour system” and
“Advanced” items) to factory preset values,
1 Press '/" to select “Reset”, and press OK.
2 Press \/| to select “Yes”, and press OK.
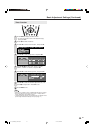
Colour System (Only AV1 or AV2 Mode)
Set the system to “Auto” for normal reception. The “Auto”
mode automatically detects the receiving signal system and
changes the reception system of the set. When the picture or
sound is not stable, switching to an appropriate system may
improve the picture or sound quality.
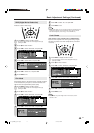
Perform steps 1 and 2 in Picture Adjustments.
Press '/" to select “Colour system”, and press OK.
Menu
[
Picture(AV1)Colour system
]
Contrast [ 3Contrast [ 3 ] ] +6 +6
Brightness [ Brightness [ ] -3] -3 +3 +3
Colour [ Colour [ ] -3] -3 +3 +3
Tint [ Tint [ ] -3] -3 +3 +3
Sharpness [ Sharpness [ ] -1 +1
Colour system
Advanced
Reset
Picture
0 0
0
0
0
0
0
0
0
0
0
0
0
00
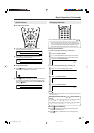
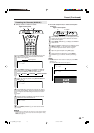
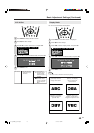
1
3
Basic Adjustment Settings
5
2
4
Selected item
Contrast
Brightness
Colour
Tint
Sharpness
dd
dd
d button
For more contrast
For more brightness
For more colour
intensity
Skin tones become
greenish
For more sharpness
cc
cc
c button
For less contrast
For less brightness
For less colour
intensity
Skin tones become
purplish
For less sharpness
3
Press '/"/\/| to select “Auto”, “PAL”, “SECAM”,
“N358”, “N443” or “PAL60” and press OK.
:
SELECT
OK:
ENTER
M :
BACK
E :
EXIT
0
Menu[Picture
Menu[Picture
(
AV1
)
Colour system]
Selected desired item
Auto PAL
SECAM N358
N443 PAL6
0
Press MENU to exit.
NOTE
• Colour system is displayed only in the AV mode.
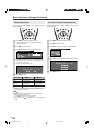
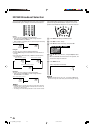
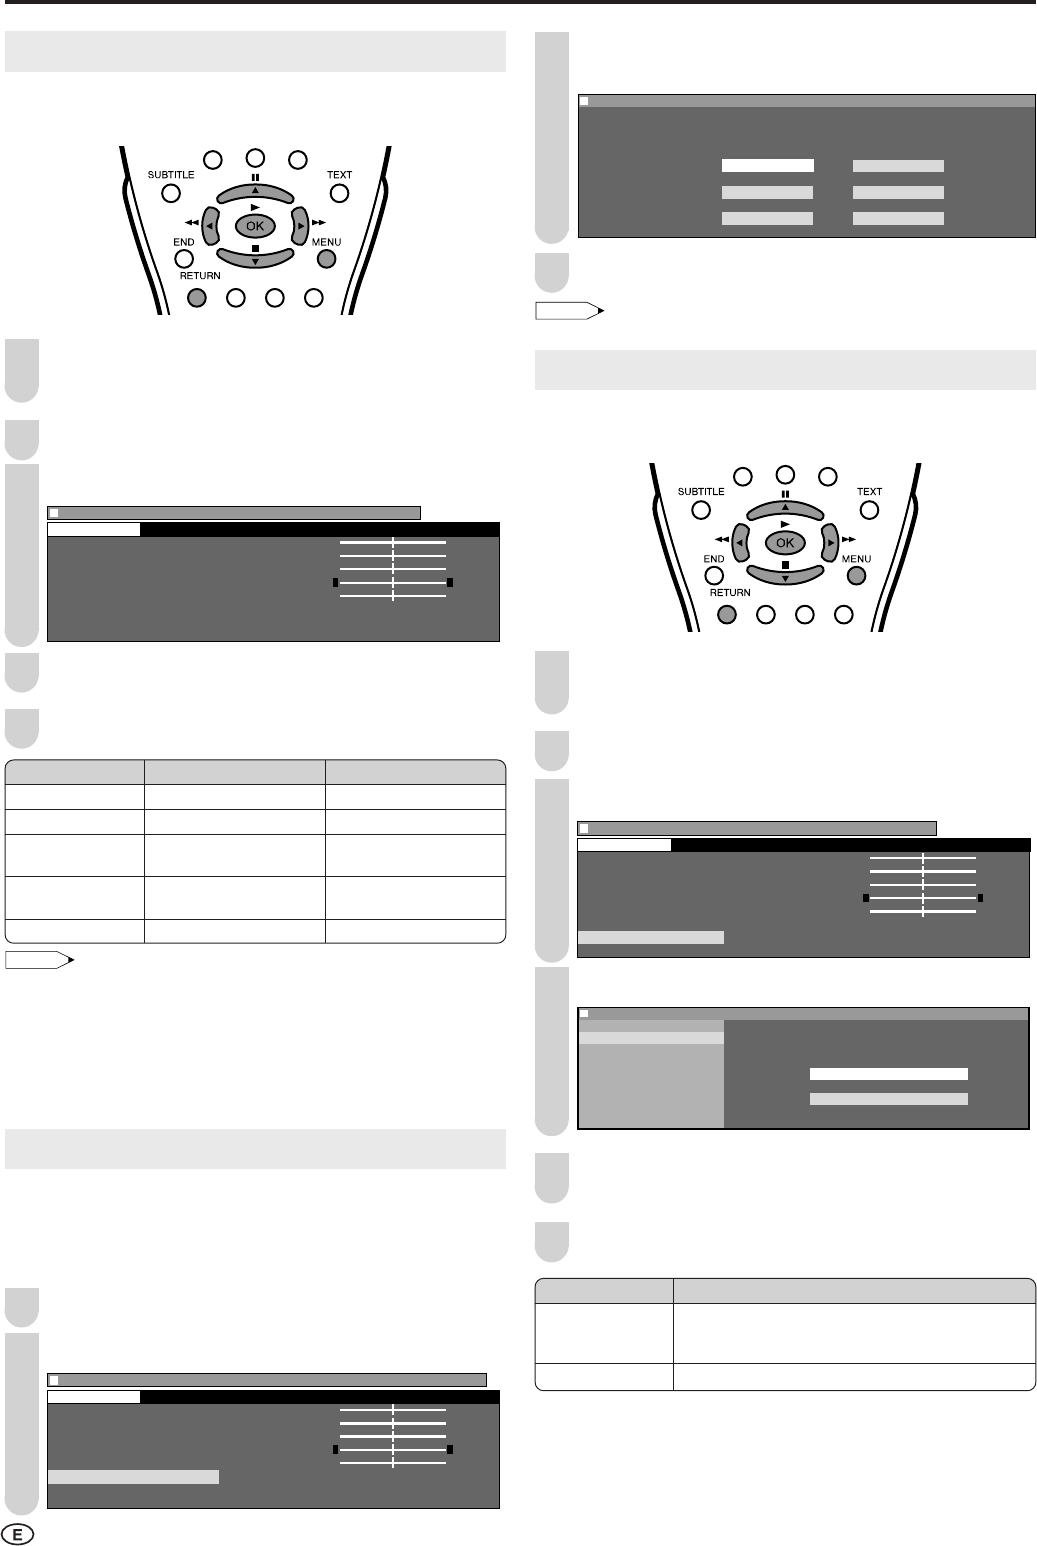
I/P Setup
Adjusting the image and input signal can give you a more
beautiful picture.
Press MENU to display the Menu screen.
• The Picture Menu screen can be displayed directly by
pressing the Red.
Press \/| to select “Picture”.
Press '/" to select “Advanced”, and press OK.
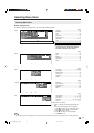
Menu
[
Picture(TV)Advanced
]
Contrast [ 3Contrast [ 3 ] ] +6 +6
Brightness [ Brightness [ ] -3] -3 +3 +3
Colour [ Colour [ ] -3] -3 +3 +3
Tint [ Tint [ ] -3] -3 +3 +3
Sharpness [ Sharpness [ ] -1 +1
Colour system
Advanced
Reset
Picture
0 0
0
0
0
0
0
0
0
0
0
0
0
00
Press '/" to select “I/P Setup”, and press OK.
:
SELECT
OK:
ENTER
M :
BACK
E :
EXIT
Menu[Picture
Menu[Picture
(
TV
)
Advanced]
I/P Setup
DNR Selected desired item
Film mode
Cool climate Interlace
Progressive
Press '/" to select “Interlace” or “Progressive”, and
press OK.
Press MENU to exit.
3
2
4
5
6
1
4
Selected item
Interlace
Progressive
Description
Use this setting when you cannot get a clear
picture with Progressive. (Especially suitable for
media with special effects like game software.)
Normally, you should select this setting.
1
2
LC-15_20B5M_E_P16-17.p65 2/19/04, 5:54 PM16