


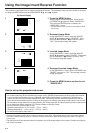


E-15
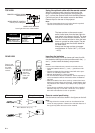
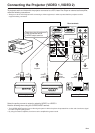
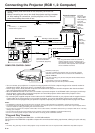
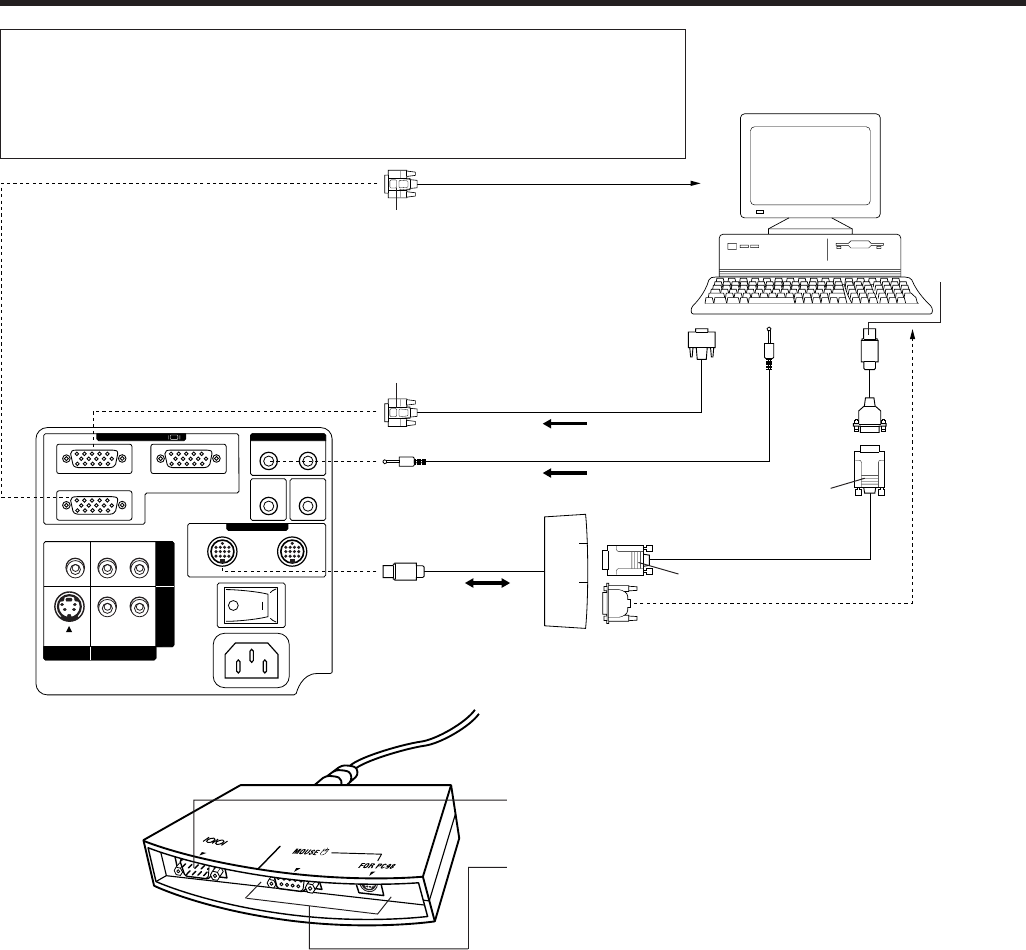
Connecting the Projector (RGB 1, 2: Computer)
COMPUTER AUDIO
PC CONTROL
COMPUTER RGB
VIDEO
S-VIDEO
12
L
OFF ON
R
LR
AUDIO
IN
2
IN
1
AUDIO
OUTPUT
IN 1
OUT
IN 2
WIRED
REMOTE
IN 1 IN 2
110-120V/
200-240V~
15-pin D-Sub
RGB Signal Cable (Supplied)
Audio Cable for Personal Computer (Supplied)
Rear terminals
• Please carefully read the manual of the computer you will be con-
necting.
• Before connecting, be sure to turn both the projector and the computer
off. After making all connections, turn the projector on first. The com-
puter should always be turned on last.
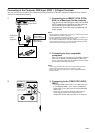
Personal computer
6-pin DIN
Mouse Control
Cable for IBM
PS/2 (Supplied)
4-pin DIN
Mouse Control
Cable for
Macintosh
Series
(Supplied)
To RS-232C
terminal
RS-232C
cable (Cross
Type, sold
separetely)
15-pin D-Sub
Computer Control Cable
(with mouse/RS-232C
input terminal) (Supplied)
Note:
• By using RGB INPUT 2 and PC CONTROL 2,
another computer can be connected to and
operated with the projector. The RS-232C func-
tion, however, will not operate when used with
the PC CONTROL 2 terminal.
Note:
• The arrows (←, ↔) indicate the
direction of the signals.
RS-232C (D-sub 9-pin)
Use when controlling the projector from your personal computer.
(RS-232C does not function when connected to PC CONTROL 2.)
MOUSE TERMINAL
Use when operating your personal computer with the wireless mouse
remote control.
Left Terminal: D-sub 9-pin (for IBM/Mac)
Right Terminal: 9-pin mini DIN (for NEC in JAPAN)
Mouse Control Cable (Supplied)
9-pin D-Sub
9-pin D-Sub
To display input terminal
COMPUTER CONTROL CABLE
• You can connect your projector to a computer for easy projection of full color computer images and an external monitor for
simultaneous viewing. See pages 16 and 17 for details of the connections.
• Refer to page 18 for a list of personal computers connectable to the projector. Use with computers other than those listed
may cause some of the functions not to work.
• When the RS-232C terminal on this unit is connected to a personal computer via an RS-232C cable (cross type) and the sup-
plied computer control cable, the personal computer can control the projector and the status of the projector can be
checked. See pages 34 and 35 for details.
• By connecting the supplied computer control cable to the PC CONTROL terminal on your projector and the supplied mouse
control cables to the mouse terminal on your personal computer, you can use the wireless mouse on the remote control,
instead of the mouse equipped with your personal computer, to operate your personal computer. Refer to page 8 for details.
Notes:
• The RS-232C function will only operate when the connection cable is connected to the PC CONTROL 1 terminal on the projector.
• The wireless mouse or RS-232C function may not operate if your computer port is not correctly set-up. Please refer to your computer owners
manual for details on setting-up/installing the correct mouse driver.
• Do not connect or remove the computer control cable, mouse control cables, or RS-232C cable to/from your computer while it is on. This may
damage your computer.
• Do not connect to the mouse input terminals on the computer control cable for IBM/Mac and PC98 simultaneously.
• Be sure to use the supplied computer control cable when connecting the PC CONTROL terminals.
“Plug and Play” Function
This projector is compatible with VESA DDC 1 and DDC 2B standards.
This projector and a VESA DDC compatible computer will communicate their setting requirements, allowing for quick and easy
set-up.
Note:
• The DDC, “Plug and Play” function of this projector is only functional when used in conjunction with a VESA DDC compatible computer.