


E-24
Adjusting the Picture
• This projector’s picture is factory preset to standard
settings. However, you can adjust it to suit your own
preferences with the ADJUSTMENT buttons on the
projector and the remote control.
• The adjustments can be memorized in RGB 1, RGB 2,
VIDEO 1 or VIDEO 2 separately.
• Four picture modes can be adjusted: “PICTURE,”
“BRIGHT,” “RED,” and “BLUE.”
Adjusting the Picture
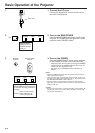
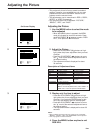
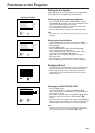
1. Use the MENU button to select the mode
to be adjusted
• When the MENU button is pressed, the MENU
mode is indicated for about 30 seconds. Press
the ADJUSTMENT ƒ/∂ buttons to select “RGB 1
ADJ.”, then press the ENTER button.
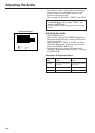
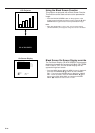
2. Adjust the Picture
• Press the ADJUSTMENT ƒ/∂ buttons to high-
light yellow the picture adjustment item you want
to adjust.
• Press the ADJUSTMENT ß/© buttons to move
the “ ” mark of the selected adjustment item to
the desired setting.
• The adjustment mode is displayed for about
30 seconds.
Description of Adjustment Items
ADJUSTMENT ß button
For less contrast
For less brightness
For weaker red
For weaker blue
For less color intensity
For less sharpness
Selected item
PICTURE
BRIGHT
RED
BLUE
COLOR
TINT
SHARPNESS
RESET
ADJUSTMENT © button
For more contrast
For more brightness
For stronger red
For stronger blue
For more color intensity
For more sharpness
1
RGB1 ADJ.
RGB1 INPUT ADJ.
IMAGE ADJ.
AUDIO
SYSTEM SETUP
LANGUAGE
:SEL. :NEXT
ENTER
:END
MENU
On-Screen Display
RGB1 ADJ.
BRIGHT
RED
BLUE
RESET
+
0
0
0
0
:SEL.
:ADJ.
:NEXT
ENTER
:END
MENU
-
+
-
+
-
+
-
PICTURE
2
All RGB Video Adjustment items are returned to the
factory preset settings.
Note: To reset all adjustment items, select “RESET” in
“RGB 1 ADJ.” mode and press the ENTER button.
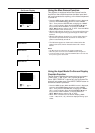
3. Display only the item to adjust
• Press the ADJUSTMENT ƒ/∂ buttons to high-
light yellow the picture adjustment item you want
to adjust. If you press the ENTER button at this
time, only the selected item will be displayed.
• Press the ADJUSTMENT ß/© buttons to move
the “ ” mark of the selected adjustment item to
the desired setting.
• The adjustment mode is displayed for about 30
seconds.
Notes:
• When a VIDEO signal input has been selected, only “PICTURE,”
“BRIGHT,” “COLOR,” “TINT” and “SHARPNESS” can be adjusted.
• TINT only appears in NTSC 3.58 mode.
4. Press the MENU button anytime to exit
RGB ADJ.
+
:SEL.
:ADJ.
:ENTER
ENTER
:END
MENU
-
PICTURE 0
3
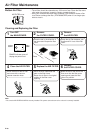
Skin tones become
purplish
Skin tones become
greenish