


SUR-25 User Manual
Ch.
SUR-25 User Manual
Ch.
Page
9
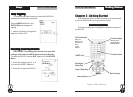
Installing BatteriesInstalling Batteries
Installing BatteriesInstalling Batteries
Installing Batteries
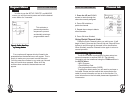
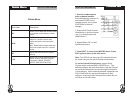
The SUR-25 operates on four AA Alkaline batteries (not
included). Batteries must be inserted before you can
operate the SUR-25. To insert the batteries, refer to the
following illustration:
Figure 3:
Installing Batteries
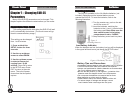
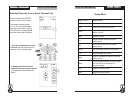
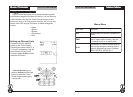
Low Battery Indicator
When the batteries are low, the battery low icon will be displayed
in the upper left-hand corner just above the SETUP button:
Figure 4: The Battery Low Icon
BatteriesBatteries
BatteriesBatteries
Batteries
22
22
2
Battery Tips and Precautions
• Immediately replace batteries when the battery low icon appears.
• The SUR-25 will retain data when batteries are replaced
• Always use fresh batteries. Alkaline batteries are recommended.
Do not mix different types of batteries.
• Be sure that the positive (+) and negative (-) polarities of the
batteries match the diagram shown in the compartment.
• Do not expose the batteries to excessive heat or flame.
• Keep batteries out of the reach of children.
• Weak batteries reduce the effective distance of the unit.
• To reduce danger of leakage and damage, remove
used batteries when used longer than two years.
1. Turn the remote over, push on the tab
and lift the cover off.
2. Insert the batteries, matching the
batteries to the (+) and (-) marks inside
the battery case. Note: Make sure the
data switch located in the battery
compartment is set to “NORM”.
3. Snap the battery cover back into place.
Page
52
Chapter 7 – Changing SUR-25
Parameters
Many of the SUR-25 parameters can be changed. This
chapter explains the different customizations you can make.
PP
PP
P
ower Downower Down
ower Downower Down
ower Down
77
77
7
Power Down Time PeriodPower Down Time Period
Power Down Time PeriodPower Down Time Period
Power Down Time Period
This setting specifies the time delay the SUR-25 will wait
until it automatically shuts down. (The touch screen will go
blank to conserve battery usage.)
This setting can be changed
from 1 to 90 minutes.
1. Press and hold the
SETUP button for three
seconds.
2. Use the up and down
arrows to select PWDN
3. Use the up/down arrows
to select a time period
ranging from 1 to 90
minutes. Press OK to return
to the SETUP menu.Press
EXIT to return to the main
menu. The unit will power
down when the time period
expires