


4 Connections
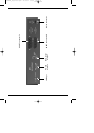
The various references below - a b c etc., refer to the diagram on page 8.
4.1 Mains connection
The receiver should be connected to the mains supply only after it has been connected to all
other components in the system. This serves to avoid damage to both the receiver and to
other components.
b Once you have made all other connections, use the mains cable supplied to connect
the receiver to a mains socket 230V/50Hz.
4.2 External unit
a Connect the LNB input of the receiver to the LNB of your external unit, using a sui-
table coaxial cable. Note point 5 of the chapter on "Installation".
4.3 Connecting to a TV set
d Connect the receiver (SCART socket TV) to the TV set (SCART socket) by means
of a SCART cable. If your TV set is appropriately equipped, it will switch automatically
to AV, and thus to satellite reception, when the receiver is switched on.
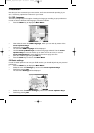
4.4 Video cassette recorder (VCR)
c Connect the video player to the SCART socket VCR. During Play mode, the video
player will send a switching signal to the receiver, and the Video player signal will
automatically be sent to the TV set.
If your video player does not transmit a switching signal, use the EXTERN key of
your receiver to switch it to the external input VCR. Pressing this key again will return
you to normal operation.
4.5 Amplifier
In order to achieve the best possible sound quality, you can connect the receiver to a hi-fi
amplifier. Use a suitable cable to connect the cinch sockets Audio R and Audio L of the
receiver with an input socket of your hi-fi amplifier (e.g. CD or AUX; NOTE that the phono
input is not suitable!).
4.6 Serial Interface RS 232
The RS 232 interface is used for pre-programming via a PC, and in order to update the ope-
rating software.
9
DIGIBOX1_englisch.qxd 26.09.01 09:55 Seite 9