


13EN 13EN
Disc
Management
Recording Playback
Introduction
Connections Basic Setup Editing Function Setup Others
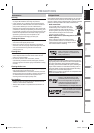
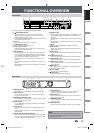
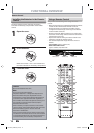
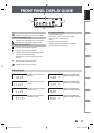
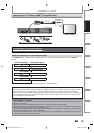
FUNCTIONAL OVERVIEW
(
*
) The unit can also be turned on by pressing these buttons.
1. INPUT SELECT
button
• Press to select the appropriate input.
2. OPEN/CLOSE A button*
• Press to open or close the disc tray.
3. Number/Character buttons
• Press to select a title/chapter/track/file on display.
• Press to enter values for the settings in the main
menu.
• Press to enter title names.
4. SETUP button
• Press to display the main menu.
• During DVD playback, press and hold for more than
3 seconds to switch the progressive scanning mode
to the interlace mode. (Though
appears, the
output mode switches to the interlace and
“
” will be displayed on the front panel
display briefly.)
5. TOP MENU button
• Press to display the title list.
6. Cursor K / L / { / B buttons
• Press to select items or settings.
7. CLEAR button
• Press to clear the password once entered, to cancel
the programming for CD, to clear the selecting
marker number in the display menu, etc.
8. SKIP H button
• During playback, press to return to the beginning of
the current chapter, track or file.
• During playback, press twice in quick succession to
skip to the previous chapter or track.
• When playback is in pause, press repeatedly to
reverse the playback step by step.
9. REV E button
• During playback, press to fast reverse playback.
• When playback is in pause, press to slow reverse
playback.
10. PAUSE F button
• Press to pause playback or recording.
11. PLAY B button*
• Press to start playback or resume playback.
12. TIME SLIP button
• Press once to start recording the TV program you
are watching. Press again to watch the content
being recorded from the beginning while recording
continues. (VR mode DVD-RW with the recording
mode of LP, EP or SLP only)
13. REPEAT button
• Press to display the repeat menu.
14. REC MODE button
• Press to switch the recording mode.
15. HDMI button
• Press to set the HDMI video resolution.
16.
I
/
y
ON/STANDBY
button
• Press to turn on the unit, or to turn the unit into the
standby mode. (To completely shut down the unit,
you must unplug the AC power cord).
• If timer programmings have been set, press to turn
the unit into the timer-standby mode.
17. SATELLITE LINK button
• Press to turn the unit into the satellite link standby
mode.
• In the satellite link standby mode, press to cancel the
mode and to turn the unit on.
18. TIMER PROG. button
• Press to display the timer programming list.
19. AUDIO
button
• Press to display the audio menu during playback.
20. DISPLAY button
• Press to display the display menu on or off.
21. MENU/LIST button
• Press to display the disc menu. To change original
and playlist on the TV screen.
22. ENTER button
• Press to confirm or select menu items.
23. RETURN
button
• Press to return to the previous displayed menu
screen.
24. SKIP G button
• During playback, press to skip to the next chapter,
track or file.
• When playback is in pause, press repeatedly to
forward the playback step by step.
25. FWD D button
• During playback, press to fast forward playback.
• When playback is in pause, press to slow forward
playback.
26. STOP C button
• Press to stop playback or recording.
• Press to exit from the title list.
27. INSTANT SKIP button
• During playback, press to skip 30 seconds.
28. 1.3x/0.8x PLAY button
• During playback, press to play back in a slightly
faster/slower speed while keeping the sound output.
29. ZOOM button
• During playback, press to enlarge the picture on the
TV screen.
30. REC I button
• Press once to start a recording.
• Press repeatedly to start the one-touch timer
recording.
E7PCAUD_DR420KU_EN.indd 13E7PCAUD_DR420KU_EN.indd 13 2/6/2009 10:55:24 AM2/6/2009 10:55:24 AM