


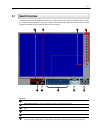

25
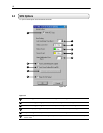
Clear All Sensors – This option clears any sensors that have been placed onto the map.
Original Size – This option resizes the map to its original size.
Zoom In – This option zooms in on the selected map.
Zoom Out – This option zooms out on the selected map.
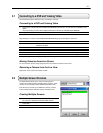
4.2 Importing a Map
You have the option to import as many maps as you wish. The Maps when imported are listed in alphabetic order.
When the need arises for several maps to be imported, it is suggested that they be named in a manner that will allow
for easy location.
Importing a Map
1) Select the MAP MANAGER file menu option and select SHOW MAP EDITOR.
The MAP DRAWING MANAGER window should open.
2) Select the ADD button.
The NEW MAP window should open.
3) Enter a name into the NEW MAP NAME field. Use a name that will quickly identify this map.
4) Select the browse icon on the CAD FILE NAME FIELD to Open a Browse window.
5) Find the file you wish to import.
Supported files are AutoCAD files (.DFX and .DWG).
6) Press the OK button.
The new map should now be displayed in the MAP LIST.
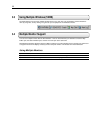
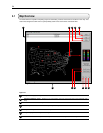
4.3 Placing Cameras and Sensors onto a Map
Placing cameras and sensors on a map allows you to easily identify locations where cameras and alarms are located.
Placing Cameras and Sensors on a Map
1) Select the MAP MANAGER file menu option and select SHOW MAP EDITOR.
The MAP DRAWING MANAGER window should open.
2) Select a map from the MAP LIST.
The map should now be displayed.
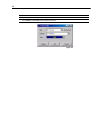
3) Drag a colored camera or sensor icon onto the map.
When you let go of the button the CAMERA (or SENSOR) INFO window will open (Figure 4.3).
4) Select a Site.
8
9
11
Figure 4.2
10