


34
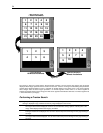
The images in Figure 5.9 show how the Preview Search functions. The first screen that appears has 24 images
displayed. Each image represents the first second of each hour. If there is no image recorded during that period then
nothing will be displayed. When an hour is selected (by double clicking on the image) then a new screen appears
with 6 images. Each of these images represents a 10 minute segment of video. Once a 10 minute segment is
selected (by double-clicking on the image) the final screen appears which breaks down that 10 minute segment into
1 minute increments (10 images).
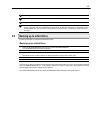
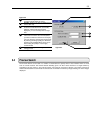
Performing a Preview Search
1) Begin by selecting a single camera. You can do this either by turning off all cameras but one, or by double
clicking a displayed image (it will then be the only image displayed on the screen)
2) Select the Preview Search Button.
24 Images should now be displayed. If there is no recorded video during a portion of the day then a ‘No
Image’ will be displayed where the image(s) should be.
3) Refine the search by selecting an image. Do this by double-clicking on the image.
6 Images should now be displayed. You can move back to the previous 24 image view by right clicking on
an image.
4) Refine the search by selecting an image. Do this by double-clicking on the image.
10 Images should now be displayed. You can move back to the previous 6 image view by right clicking on
an image.
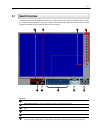
Figure 6.4
12
3
4
5
1098
7
6
11
12
13
14
15
16 17
21 22
18 19 20
23 24
1 2 3
4
5 6
1
6
1M inuteIncrements
2
3
4
5 7
8
9
10
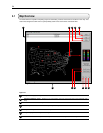
1 Hour Increments
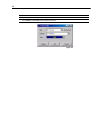
10 Minute Increments
1 Minute Increments
1 Hour Displayed
10 Minutes Displayed
1 Day (24 Hours) Total