


Operation
36 Vidikron Vision Model 90t and Model 100t Owner’s Operating Manual
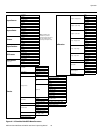
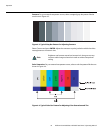
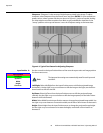
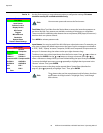
Sharpness: “Sharpness” is the amount of high-frequency detail in the image. To adjust
sharpness, select Sharpness from the Picture menu and press ENTER. On your external test
pattern source, select a pattern like the one shown in
Figure 4-5. Adjust as needed, looking
for white edges around the transitions from black to gray and different sized lines in the
“sweep” patterns at the top and bottom. Lower the sharpness setting to eliminate them.
Figure 4-5. Typical Test Pattern for Adjusting Sharpness
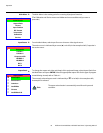
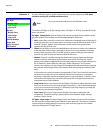
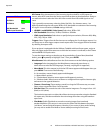
Input Position Use the controls in the Input Position Menu to fine-tune the aspect ratio and image position
for the current source.
Left/Right: Select Left/Right from the Input Position menu to shift the projected image
horizontally. Use the right or up cursor button to shift the image to the right; use the left or
down button to shift it to the left.
Up/Down: Select Up/Down from the Input Position menu to shift the projected image
vertically. Use the right or up cursor button to shift the image upward; use the left or down
button to shift it downward.
Width: Select Width from the Input Position menu to change the projected image width. Use
the right or up cursor button to increase the width; use the left or down button to decrease it.
Height: Select Height from the Input Position menu to change the projected image height.
Use the right or up cursor button to increase the height; use the left or down button to
decrease it.
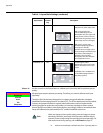
Input Position
Left/Right
Up/Down
Width
Height
Overscan
➤
The input position settings are automatically saved for each input and
resolution.
Note