


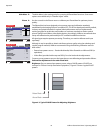
Operation
38 Vidikron PlasmaView Owner’s Operating Manual
PRE
L
IMINAR
Y
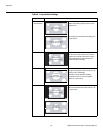
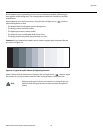
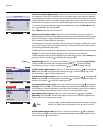
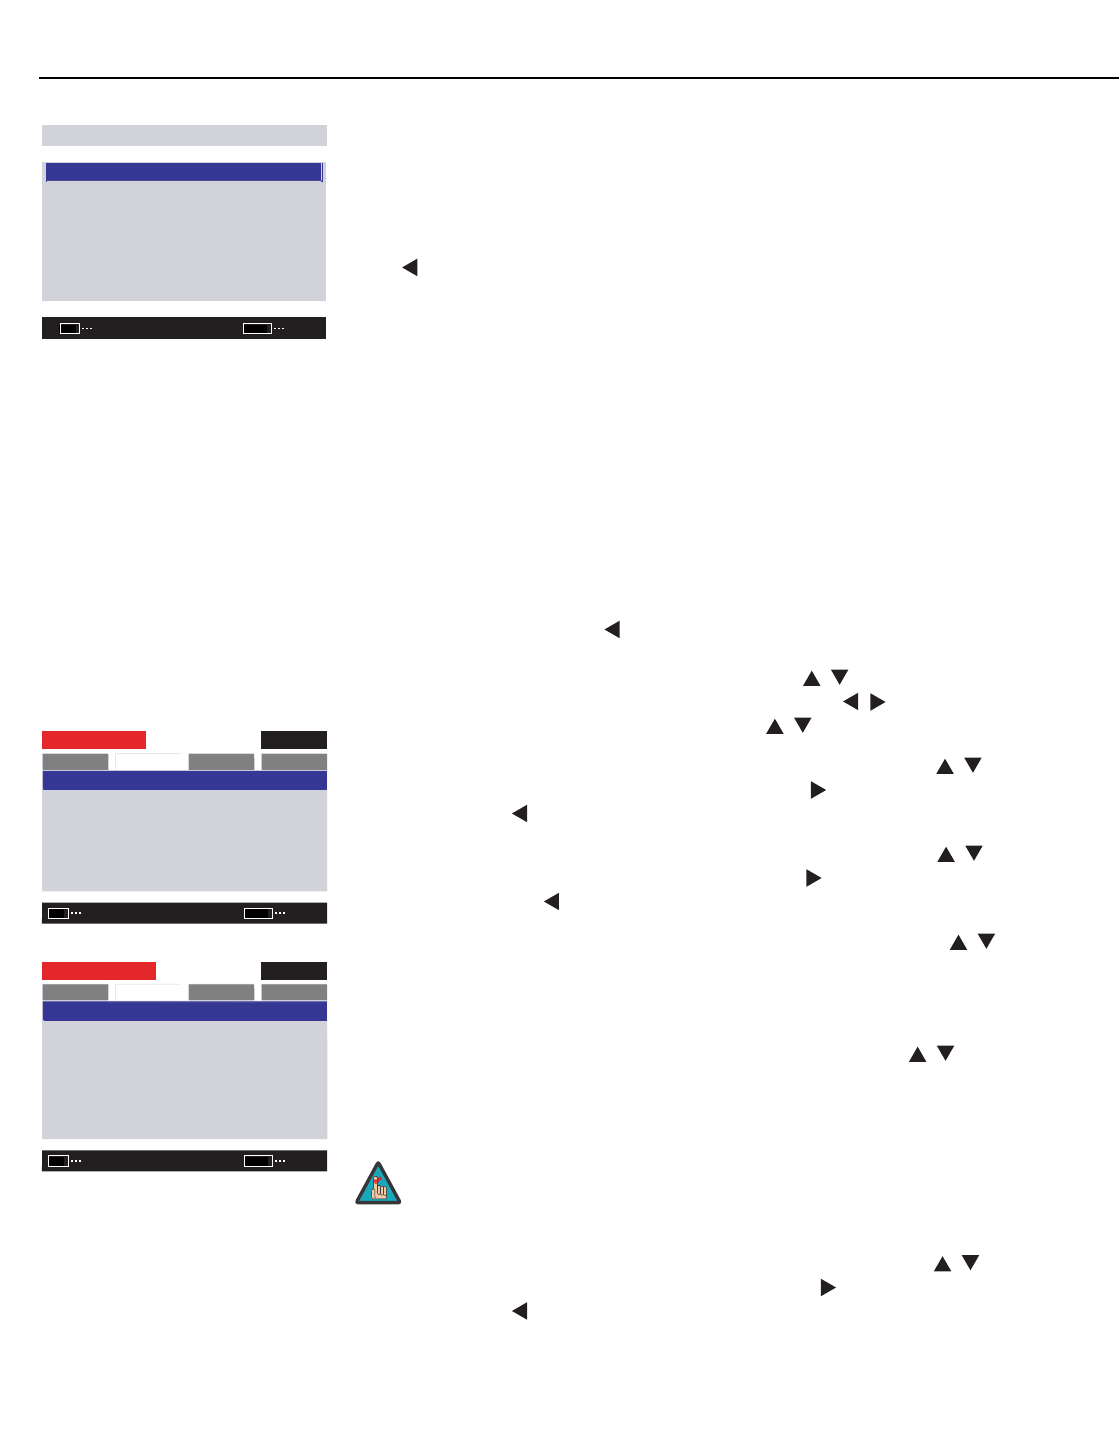
Color Chart (Installer Adjust mode): Select Color Chart from the Picture menu to adjust the
color density for each of the six primary colors: red, yellow, green, cyan, blue and magenta.
Changing these settings for a primary color alters the hue of that color and affects the gamut
(range) of possible colors. For example, changing the value for red moves the color closer to
either yellow or magenta, which in turn affects all displayed colors having a red component.
To reset the color gamut settings to the factory default values, select C. Chart Reset. Then,
press
to highlight YES and press SET.
Select Return to exit the Color Chart menu.
Gamma (Installer Adjust mode): The Gamma control determines how gray shades are
displayed between minimum input (black) and maximum input (white) for all signals. A good
gamma setting helps to optimize blacks and whites while ensuring smooth transitions for
the “in-between” values utilized in other grays.
Unlike brightness and contrast controls, Gamma allows you to lighten or darken the overall
tone of your images without changing the extremes. All images will be more vibrant while
still showing good detail in dark areas.
The default Gamma setting of 2.2 is appropriate for most typical home theater environments.
Factory: To reset all picture quality settings for the current input to the default,
installer-adjusted values (or factory defaults, if in Installer Adjust mode), select Factory from
the Picture menu. Then, press
to highlight YES and press SET.
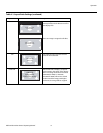
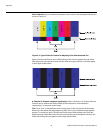
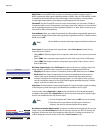
Screen Image Position: Use the up- or down-arrow buttons ( , ) to highlight Image Position.
Then, press SET and use the left- and right-arrow buttons ( , ) to shift the image
horizontally; use the up- or down-arrow buttons ( , ) to shift the image vertically.
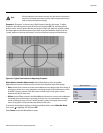
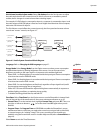
V Shift (Installer Adjust mode): Use the up- or down-arrow buttons ( , ) to highlight V
Shift. Then, press SET and use the right-arrow button ( ) to shift the image up; use the
left-arrow button ( ) to shift the image down.
H Shift (Installer Adjust mode): Use the up- or down-arrow buttons ( , ) to highlight H
Shift. Then, press SET and use the right-arrow button ( ) to shift the image to the right; use
the left-arrow button ( ) to shift the image to the left.
Frequency Adjust (Input 1 only): Use the up- or down-arrow buttons ( , ) to highlight
Freq. Adj. Then, press SET. The Frequency Adjust control adjusts the PlasmaView’s internal
clock frequency in small increments to match that of the incoming signal. Use it to reduce or
eliminate letter breakup, flickering or other “noise” in a computer screen image.
Phase Adjust (Input 1 only): Use the up- or down-arrow buttons ( , ) to highlight
Phase Adj. Then, press SET. Use the Phase Adjust control to correct color misalignment or
flickering text in a computer screen image.
H-Size (Installer Adjust mode): Use the up- or down-arrow buttons ( , ) to highlight
H-Size. Then, press SET and use the right-arrow button ( ) to increase the width; use the
left-arrow button ( ) to decrease it.
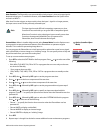
COLOR CHART
RED : +30
YELLOW : +30
GREEN : +30
CYAN : +30
BLUE : +30
MAGENTA : +30
C. CHART RESET
RETURN
ENTER
SET
EXIT
MENU
➤
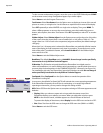
INPUT 1
PLASMAVIEW
SCREEN
SET-UP
OPTION
PICTURE
SETSET
EXIT
MENU
: 0 / 0
: 0
: 0
IMAGE POSITION
FREQ. ADJ.
PHASE. ADJ.
IMAGE RESET
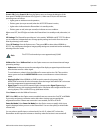
INPUT 1
INSTALLER ADJ.
SCREEN
SET-UP
OPTION
PICTURE
SETSET
EXIT
MENU
: +128
: +128
: +128
: +4
: 0
: 0
H SHIFT
V SHIFT
FREQ. ADJ.
PHASE ADJ.
H-SIZE
V-SIZE
IMAGE RESET
Frequency Adjust and Phase Adjust are adjustable only when Auto Setup
Mode (in the Option menu, described later in this section) is set to OFF.
Note