


10 Advanced Functions
Note
A point to notice
Info.
Supplementary information
Recording Techniques
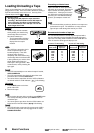
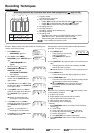
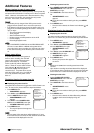
<PROGRAM TO RECORD>
DW START END HR
1 --- --:-- --:-- ------
2 --- --:-- --:-- ------
3 --- --:-- --:-- ------
4 --- --:-- --:-- ------
5 --- --:-- --:-- ------
6 --- --:-- --:-- ------
7 --- --:-- --:-- ------
8 --- --:-- --:-- ------
165432
1) Program number
Up to 8 programs can be set.
2) Day of the week display
• Display HLD to apply HOLIDAY SET UP setting (
next page).
• Display SPL to apply SPECIAL DW setting (
next page).
• Display DAY to record at the programmed time everyday.
3) Recording start-time
4) Next day indicator (•)
Recording continues to the following day.
5) Recording end-time
6) Recording mode
• Recording mode varies by the TAPE LENGTH setting of FIRST
TIME SET UP menu. See the table shown to the left.
• Timer recording will not be performed when set to SKIP.
Info.
• Time is displayed in 24-hour format.
Accurately preset the day and present time before timer programming. ( page 9 or 28)
Timer Recording
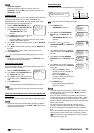
<MAIN MENU>
DISPLAY
TIMER PROGRAM
RECORDING SET UP
REAR TERMINAL
MAINTENANCE
CLOCK/FIRST TIME SET UP
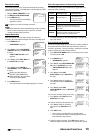
<TIMER PROGRAM>
PROGRAM TO RECORD
HOLIDAY SET UP
SPECIAL DW MON-SAT
<PROGRAM TO RECORD>
DW START END HR
1 DAY 08:00 20:00 L30EP
2 --- --:-- --:-- ------
3
--- --
:
-- --
:
-- ------
<PROGRAM TO RECORD>
DW START END HR
1 DAY 08:00 20:00 L30EP
2 --- --:-- --:-- ------
3 --- --:-- --:-- ------
<PROGRAM TO RECORD>
DW START END HR
1 DAY 08:00 20:00 L30EP
2 TUE --:-- --:-- ------
3 --- --:-- --:-- ------
<PROGRAM TO RECORD>
DW START END HR
1 DAY 08:00 20:00 L30EP
2 TUE 12:00 --:-- ------
3 --- --:-- --:-- ------
<PROGRAM TO RECORD>
DW START END HR
1 DAY 08:00 20:00 L30EP
2 TUE 12:00 15:00 ------
3 --- --:-- --:-- ------
<PROGRAM TO RECORD>
DW START END HR
1 DAY 08:00 20:00 L30EP
2 TUE 12:00 15:00 L18EP
3 --- --:-- --:-- ------
<PROGRAM TO RECORD>
DW START END HR
1 DAY 08:00 20:00 L30EP
2 TUE 12:00 15:00 L18EP
3 --- --:-- --:-- ------
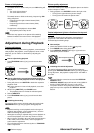
Example : Setting number 2 to L18H mode timer recording from
12:00 to 15:00 every Tuesday.
1. Press MENU button.
• <MAIN MENU> appears.
2. Turn JOG to select TIMER
PROGRAM and turn SHUTTLE to the
right.
• <TIMER PROGRAM> menu
appears.
3. When the cursor (
) is next to
PROGRAM TO RECORD, turn
SHUTTLE to the right.
• <PROGRAM TO RECORD>
menu appears.
4. Turn JOG to select the program
number and turn SHUTTLE to the
right to select.
5. In the DW column, turn JOG to select
the Day of the Week. Turn SHUTTLE
to the right to select.
6. In the START column, turn JOG to
select the
hour
digits of the start time.
Turn SHUTTLE to the right when
done.
Set the
10-minutes
digit and
1-
minute
digit in a similar fashion.
7. In the END column, turn JOG to
select the
hour
digits of the end time.
Turn SHUTTLE to the right when
done.
Set the
10-minute
digit and
1-
minute
digit in a similar fashion.
8. In the HR column, turn JOG to select
the RECORDING mode.
Setup step 9 to make recording while the REC IN terminal is
grounded. If not, go to step 10.
9. Press MENU button.
• The program you are currently
setting is highlighted.
• Press MENU button again to
cancel.
10. Turn SHUTTLE to the right when done. (Cursor flashing will
stop.)
• If the program has not been set completely, the DW
column will continue to flash.
Repeat steps 4 to 10 to set 2 or more programs at once.
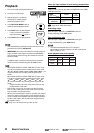
11. Press MENU button.
• The day and present time display appears on screen.
12. Press TIMER REC button.
• The VCR is turned off and the Timer Recording indicator
(
) illuminates on the fluorescent display.
When TIMER REC button is pressed during the
programmed period, the VCR starts recording
immediately.
Info.
When the Timer Recording indicator ( ) starts flashing, check
for the following conditions:
a) A tape is not inserted.
b) A tape without erase prevention tab is inserted.
c) Day and present time has not been set.
d) Timer program has not been set.
e) Menu item has been set (flashing).
– Remedy -
1. Press TIMER REC button to turn off the Timer Recording
indicator (
).
2. a) Insert a tape.
b) Insert a tape with erasure prevention tab intact.
c) Set the day and present time (
page 9 or 28)
d) Confirm the program.
e) Turn SHUTTLE to the right to stop flashing.
3. Press TIMER REC button to turn on the Timer Recording
indicator.
T-120
T-160
8EP L24EP L40EP 64EP
96EP 128EP 0EP SKIP
6EP L18EP L30EP 48EP
72EP 96EP 0EP SKIP