


12 Advanced Functions
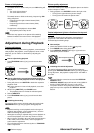
Note
A point to notice
Info.
Supplementary information
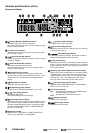
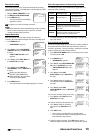
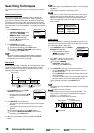
Alarm recording counter
01-01-’01 09:30:00 A0001
<RECORDING SET UP>
ALARM REC MODE L30H
ALARM REC DURATION 10M
EMERGENCY REC ON
SUPER RESOLUTION ON
ONE SHOT•FIELD 1
ONE SHOT•INTERVAL SHOT
Emergency Recording
The VCR automatically starts an alarm recording when an alarm
signal is input even if the VCR is in stop mode, turned off or in
stand-by for timer recording. After an emergency recording, the
VCR automatically returns to its original state.
1. After step 6 of
Alarm Recording
, turn
JOG to select EMERGENCY REC
and turn SHUTTLE to the right.
2. Turn JOG to select ON and turn
SHUTTLE to the right.
• The Emergency Recording
indicator (
) illuminates on
the fluorescent display.
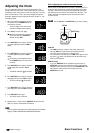
Display during alarm recording
• During the alarm recording, the alarm
recording counter will automatically be
displayed on screen if DISPLAY MODE
(
page 30) is set to 1, 2 or 3.
• The Alarm Recording indicator (
)
on the fluorescent display flashes
during alarm recording and stays on
when the alarm recording is finished.
• The alarm recording counter shows up
to 9999 alarm recordings, then it is
reset to 0000 and continues counting.
• When initializing the alarm recording
list, the alarm recording counter will
also be reset.
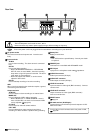
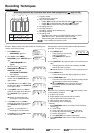
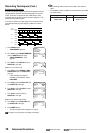
Series Recording 1
Series recording is possible if two or more of these units are
connected. When the first VCR’s tape reaches its end or an
error occurs on VCR, the second VCR automatically begins
recording.
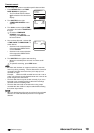
1. Press MENU button.
• <MAIN MENU> appears.
2. Turn JOG to select REAR TERMINAL
and turn SHUTTLE to the right.
• <REAR TERMINAL> menu
appears.
Step 3 and 4 on 1st VCR only:
3. When the cursor ( ) is next to CALL
OUT, turn SHUTTLE to the right.
4. Turn JOG to select WRNG•TAPE
END and turn SHUTTLE to the right.
Step 5 and 6 on 2nd VCR only:
5. Turn JOG to select REC IN and turn
SHUTTLE to the right.
6. Turn JOG to select SERIES and turn
SHUTTLE to the right.
7. Press MENU button.
• The day and present time display
appears on screen.
<MAIN MENU>
DISPLAY
TIMER PROGRAM
RECORDING SET UP
REAR TERMINAL
MAINTENANCE
<REAR TERMINAL>
CALL OUT WRNG
CLOCK OUT REC- 1
MODE OUT REC
REC IN REC-START/STOP
<REAR TERMINAL>
CALL OUT WRNG
CLOCK OUT REC- 1
MODE OUT REC
REC IN REC-START/STOP
<REAR TERMINAL>
CALL OUT WRNG•TAPE END
CLOCK OUT REC- 1
MODE OUT REC
REC IN REC-START/STOP
<REAR TERMINAL>
CALL OUT WRNG
CLOCK OUT REC- 1
MODE OUT REC
REC IN REC-START/STOP
<REAR TERMINAL>
CALL OUT WRNG
CLOCK OUT REC- 1
MODE OUT REC
REC IN SERIES
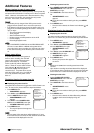
<MAIN MENU>
DISPLAY
TIMER PROGRAM
RECORDING SET UP
REAR TERMINAL
MAINTENANCE
CLOCK/FIRST TIME SET UP
<FIRST TIME SET UP>
TIME DATE ADJUST
TAPE END STOP
QUASI V-SYNC ON
VIDEO MODE AUTO
TAPE LENGTH T-120
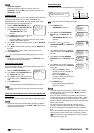
<FIRST TIME SET UP>
TIME DATE ADJUST
TAPE END STOP
QUASI V-SYNC ON
VIDEO MODE AUTO
TAPE LENGTH T-120
<FIRST TIME SET UP>
TIME DATE ADJUST
TAPE END REWIND
QUASI V-SYNC ON
VIDEO MODE AUTO
TAPE LENGTH T-120
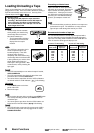
Series Recording 2
Series Recording 2
provides a function: when the first VCR’s
tape reaches its end, the second VCR automatically begins
recording. When the tape in second VCR finishes, the first VCR
starts recording again. (The two VCRs keep recording one after
another.)
Setup both 1st and 2nd VCRs as in the steps below.
1. Repeat step 1 to 6 of
Series Recording 1
.
Steps 3 to 6 must be set to both 1st and 2nd VCRs.
2. Turn SHUTTLE to the left.
• <MAIN MENU> appears.
3. Turn JOG to select CLOCK/FIRST
TIME SET UP and turn SHUTTLE to
the right.
• <FIRST TIME SET UP> menu
appears.
4. Turn JOG to select TAPE END and
turn SHUTTLE to the right.
5. Turn JOG to select REWIND and turn
SHUTTLE to the right.
6. Press MENU button.
• The day and present time display appears on screen.
page 27 for series recording connection
Note
• Timer or emergency recording function cannot be used with
series recording at the same time.
Recording Techniques (Cont.)