


28 Installation
Note
A point to notice
Info.
Supplementary information
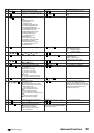
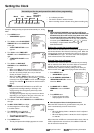
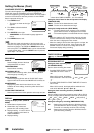
Example : Setting the day and present time to 8:25 p.m., 9 July,
2002.
1. Press MENU button.
• <MAIN MENU> appears.
2. Turn JOG to select CLOCK/FIRST
TIME SET UP and turn SHUTTLE
to the right.
• <FIRST TIME SET UP> menu
appears.
3. Turn JOG to select TIME DATE
ADJUST and turn SHUTTLE to the
right.
• <TIME DATE ADJUST> menu
appears.
4. Turn JOG to set DAYLIGHT
SAVINGS and turn SHUTTLE to
the right.
• When set to ON, the clock moves forward one hour.
• When set to AUTO, the clock moves forward one hour
from the 1st Sunday of April (at 2 a.m.) to the last
Sunday of October (at 3 a.m.).
• When set to ON or AUTO and the clock is put forward
one hour, the Daylight Saving Time symbol (
) is shown
next to the hour digit of TIME on screen and the Daylight
Saving Time indicator ( ) illuminates on the fluorescent
display.
Note
• When the DAYLIGHT SAVINGS is set to AUTO, the
programmed recordings starting or finishing in the
daylight saving time changeover period may not be
recorded correctly.
• The daylight saving time may vary from the one above
depending on your region or the year, in this case, set
DAYLIGHT SAVINGS to ON or OFF manually.
5. Turn JOG to show “07” for MONTH and turn SHUTTLE to
the right.
6. Set DAY, YEAR, TIME (hour digits,
10-minute digit and 1-minute digit)
in a similar fashion.
7. Turn SHUTTLE to the right while
the 1-minute digit of TIME is flashing.
• The setting is now complete.
• <FIRST TIME SET UP> menu appears.
8. Press MENU button.
• The day and present time display appears on screen.
Setting the Clock
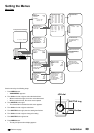
<MAIN MENU>
DISPLAY
TIMER PROGRAM
RECORDING SET UP
REAR TERMINAL
MAINTENANCE
CLOCK/FIRST TIME SET UP
<FIRST TIME SET UP>
TIME DATE ADJUST
TAPE END STOP
QUASI V-SYNC ON
VIDEO MODE AUTO
TAPE LENGTH T-120
<TIME DATE ADJUST>
DAYLIGHT SAVINGS OFF
MONTH 01
DAY 31
YEAR 2001
TIME 00:00:00
• ’01 indicates year 2001.
• The clock is shown in 24-hour format.
• Alarm recording counter is shown during alarm recording only.
<TIME DATE ADJUST>
DAYLIGHT SAVINGS AUTO
MONTH 01
DAY 31
YEAR 2001
TIME 00:00:00
<TIME DATE ADJUST>
DAYLIGHT SAVINGS AUTO
MONTH 07
DAY 09
YEAR 2002
TIME 20:25:00
Accurately set the day and present time before timer programming.
Month
Day
Year
Hour
Alarm
Recording
Counter
Second
Minute
07-09-’01 20:25:00 A0001
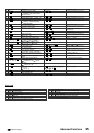
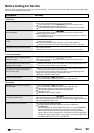
<RECORDING SET UP>
ALARM REC MODE 6H
ALARM REC DURATION 1M
EMERGENCY REC OFF
SUPER RESOLUTION ON
ONE SHOT•FIELD 1
ONE SHOT•INTERVAL SHOT
<REAR TERMINAL>
CALL OUT WRNG•TAPE END
CLOCK OUT REC- 1
MODE OUT CLOCK ADJ
REC IN SERIES
Info.
• When DAYLIGHT SAVINGS is set to ON or OFF and a
tape is not inserted in the VCR, DAYLIGHT SAVINGS can
be switched to ON or OFF on the front panel of the VCR
by pressing STOP button and EJECT button together.
• To move the displayed position of the day and present time
on screen, press POSITION button (
) or ( ). ( ) moves
the display in a right-forward direction and (
) in a
downward direction.
Setting the current time to exact second
Set the clock as described above, but set minute digits to one or
two minutes ahead of the reference time being used. When the
reference time reaches 00 seconds of the minute you have set,
turn SHUTTLE to the right. The VCR’s clock now corresponds
to the reference time to the nearest second.
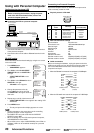
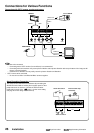
External time clock adjustment
The VCR’s clock can be set to the nearest hour by connecting
with an external clock. When 2 or more VCRs are connected
together, the clock can be set to the 1st VCR’s clock
simultaneously. Make the following settings to all VCRs you
wish to set the clock. (
previous page for the connection)
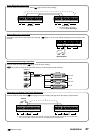
1. Press MENU button.
• <MAIN MENU> appears.
2. Set ALARM REC DURATION of
<RECORDING SET UP> menu to
other than MAN1.
3. Set MODE OUT of <REAR
TERMINAL> menu to CLOCK
ADJ.
4. Press MENU button.
• The day and present time
display appears on screen.
How the external time clock adjustment works
When the RST IN terminal is grounded at the rear panel, the
clock is automatically set to the nearest hour.
Example:
• When the display shows 11:29:59, the clock is adjusted
to 11:00:00.
• When the display shows 11:30:00, the clock is adjusted
to 12:00:00.
When more than 2 VCRs are connected and the clock of the 1st
VCR is adjusted to the nearest hour, the additional VCRs will
also be set to the nearest hour.