


80 81
MOTION
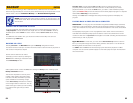
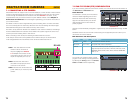
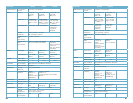
Motion Tab
As with the Alarm function above, it incorporates hold time and can trigger procedures.
Select which cameras you wish to start recording on motion detection. Set the holding time
which determines the length of time the cameras continue recording after motion stops.
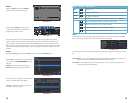
To Record allows you to determine which cameras will begin recording. Cameras can
be set to record individually, in blocks, or all cameras can be activated.
To PTZ activates preset, cruise or track functions on selected Pan-Tilt-Zoom
cameras. Depending on your model of PTZ camera, one of up to 128 pre-set actions
can be engaged. Check your camera’s manual for details.
Schedule Tab
Set by default to always on, the schedule can be altered in the same manner as that used in
Schedule in SECTION 4.4.
PICTURE 8-6
PICTURE 8-7
PICTURE 8-8
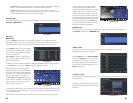
In the Trigger setting, you can set multiple
channels to record when motion is detected
by a camera that has been set to activate
upon motion detection.
For example: If Camera 1 detects motion,
you can have it trigger Cameras 2 and 3 to
begin recording as well.
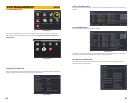
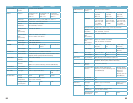
In addition, the user can set the sensitivity of certain areas within the field of view by clicking
on the Select button selecting the Area field for the respective camera.
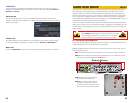
Specific areas can be made sensitive by
applying a blue grid to the desired section of
the screen. The blue grid can be applied to
the entire screen – signifying that the entire
field of view is sensitive - by clicking on
the star button. The trash can button will
remove the grid completely. Click and drag
with the mouse on the screen to draw or
erase the grid in select areas.
Sensitivity: 6Sensitivity: 6
As sensitivity is influenced by color and light level, you can adjust its values according to your
specific conditions. The default value is “4.” A setting of “8” is most sensitive while a setting of
“1” is minimally sensitive.
Right-clicking in the screen will show or hide the control menu at the bottom of the screen.
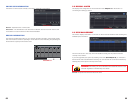
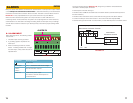
VIDEO LOSS
In the event that signal is lost by one camera, others can be activated to record while
additional devices can also be triggered.
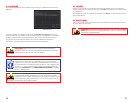
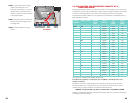
Test your settings by moving something
or someone through the grid area in the
camera’s view. Motion should not be detected
outside of this area but you should see a
yellow humanoid figure appear in the screen
once the DVR detects movement within the
grid. Removing the grid where there is a flag
or trees that frequently move in the wind will
prevent false alerts. Click on the Disk button
to save your settings before exiting the setup
process by clicking on the X button.
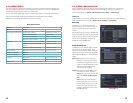
Schedule Tab
This is also set to be on all the time by default and it can be adjusted in the same manner as
the Schedule configuration in SECTION 4.4.
PICTURE 8-9
PICTURE 8-10
PICTURE 8-11
PICTURE 8-12
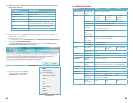
Like the Trigger tab in the Alarm Handling
section of the Sensor menu, you can select
the events that you wish to occur in the
event that a video input is lost. Both Alarms
and PTZ events can be scheduled as in the
Sensor menu above.
OTHER ALARM
In this menu you can set the DVR to alert you to a full Hard Drive, IP Conflict on the network or
a Disconnection.
You can set the response as well as at what
threshold of remaining disk space you wish to
be alerted.
Sensitivity: 6Sensitivity: 6