


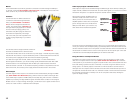

18 19
CHAPTER 4 BASIC OPERATION
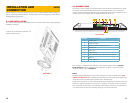
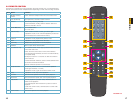
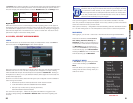
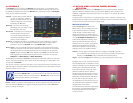
3.3 FRONT AND SIDE PANEL BUTTONS
There are eight buttons total on the DVR itself. A single button on the front panel is used to
turn the DVR or its monitor on or off. The seven buttons on the side have multiple functions
depending on context.
Number Function
1 When the device is off, press it for several seconds to boot up the device. Press
it for a short time to turn off screen.
When the device is on, press and hold to shut down the device.
2 Power indication light
3 Infrared remote control signal receiver
4 Mode button. Used to switch between PC input signal and main board signal.
5 Switch the current activated control. Go upward when used to modify setup.
Auxiliary function such as control and switch the PTZ menu.
6 Switch the current activated control. Go downward when used to modify setup.
Auxiliary function such as control and switch the PTZ menu.
7 Switch the current activated control.
Used to adjust playback control bar to go left during playback.
8 Switch the current activated control.
Used to adjust the playback control bar to go right during playback.
9 Go back to the previous menu or cancel current selection.
10 Confirm current operation
Go to the default button
Go to the menu
11 Headphone/Speaker port
12 Microphone port
13 USB port
PICTURE 3-4
BASIC OPERATION
CHAPTER 4
This chapter is intended to get your system operational in a baseline format now that you’ve
connected your system and turned it on. It combines information and instructions on several
submenus and settings but may not mention all of the functions or options available in a given
menu. For many users, these basic operating instructions may be all they need to operate
their security system. But, because this system offers many more features, later chapters will
cover those additional operations in greater detail.
4.1 OPERATION
This DVR can be controlled through the USB mouse, the remote control or by using the
buttons on the right side of the device. For the purposes of this manual, instructions will be
given for using the mouse.
In operation, the mouse functions in the same manner as one would use a mouse attached
to a computer; point, click, right-click, and etcetera. In fields where data needs to be entered,
clicking on the field will bring up a virtual keyboard. (See Section 3.1 Mouse Control)
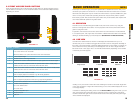
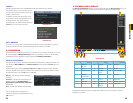
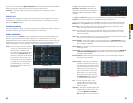
4.2 LIVE VIEW
Live View is the default mode for the DVR. It will display the video feeds from up to 16
cameras and you do not need to be logged into the DVR to view or change the channel(s) on
the screen. The actual number of channels displayed depends on the number of cameras you
own as well as how many channels your model supports. You can view a single channel in
full-screen mode or four, eight, nine or 16 channels simultaneously depending on the number
of channels your DVR supports.
Single Screen 4 Screens 8 Screens
9 Screens 16 Screens
PICTURE 4-1
Clicking on any one screen in multi-view mode will bring that screen to full-screen single-view
mode. The exception is in eight-view where clicking on one of the smaller displays will move it
to the larger display.
In addition to selecting the viewing mode from the Shortcut Menu using the mouse, you can
also cycle through the modes using the up and down arrows on the remote or the side of
the DVR. The left and right arrows on both the remote and DVR side panel will cycle through
which channels are displayed.
2
1
4
5
6
7
8
9
10
11
12
13
3