


58 59
CHAPTER 7 ALARMS
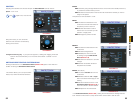
7.3 ALARM SETUP AND ACTIVATION
Once external alarms are properly connected, you can configure the DVR to activate them.
The Alarm interface can be selected from the
Setting menu.
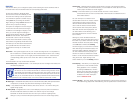
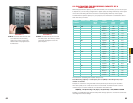
The upper portion of this window is used to choose an alarm, its configuration and its type.
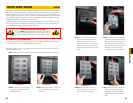
PICTURE 7-2
PICTURE 7-3
PICTURE 7-4
PICTURE 7-5
Alarm In – Select the alarm channel you are
configuring.
Event Type – Choose between Local Input
and Network Input
Enable – When this is selected the alarm
response(s) in the bottom portion of
this window are enabled.
Type – Alarms are either Normally Open (NO)
or Normally Closed (NC)
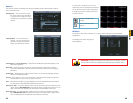
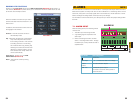
The bottom portion of the window allows you to choose what actions the DVR will initiate
when an alarm is activated along with scheduling when the alarms are active.
Period – This is for setting the schedule for
when alarms are active. Clicking the
Set button opens up a new window.
Its operation is exactly like the setting
window used to schedule motion
detection and covered in Section
4.7.
You can set the schedule in up to six blocks
of time for specific days of the week or by
weekday and weekend.
Clicking the Set button next to the day drop
down allows you to specify which days are
work days and which are not.
Anti-dither – This is the hold time you want the system to delay before beginning recording on
an alarm.
Latch Time – This is the time that the DVR will before starting a new event (10 seconds to 300
seconds (5 minutes)) after the alarm is ended.
Alarm Out – This will send an alarm signal to up to three connected external alarms when
enabled.
Show Message – When this is enabled, an alert message will be displayed on the DVR’s
screen.
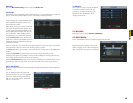
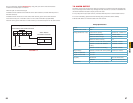
Alarm Out – To utilize this feature you must connect have at least one external alarm attached
to the DVR. You may have up to three separate alarms.
Show Message – When this is enabled, the system will bring up the Alarm Status window
whenever an event is detected. You can configure this to display when motion, video
loss or masking is detected.
Alarm Upload – The system can upload the alarm to the network including to an alarm
monitoring service.
Send E-mail – E-mail notifications can be sent a single e-mail address. Please see the
Section 1.2 Advanced Network Setup in the Remote Monitoring Guide for
instructions on how to set up the e-mail alerts including recipient address.
Record Channel – When one camera detects an event, you can set the DVR to activate
recording on other cameras.
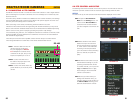
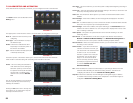
PICTURE 7-5
PTZ Activation – If you have Pan-Tilt-Zoom
cameras connected to the DVR, you
can cause them to be activated when
an alarm occurs. You can further
instruct it to perform one of 255 pre-
set activities. You can also allow a
delay of 0 to 300 seconds before
the PTZ camera(s) activates. Setting
up these pre-programmed functions
is covered in Section 6.2 PTZ
Control and Setup.
Tour - When enabled, this causes the DVR’s display to cycle through selected Live View
channels while maintaining the selected recording functions. Instructions for
configuring this feature are found in Section 5.3 Setting Menu.
Snapshot - When this is selected, the DVR will begin recording still images, in addition
to whatever video is being recorded, and it will upload or e-mail these images as
configured in Section 5.3 Setting Menu.