


60 61
CHAPTER 8 HARD DISK DRIVE
HARD DISK DRIVE
CHAPTER 8
Your DVR uses a standard desktop computer SATA (Serial Advanced Technology Attachment)
hard disk drive and will support up to a 2TB (terabytes) drive. These drives are the current
industry standard and may be purchased wherever computer parts are sold. Depending on
where you purchased your DVR, it may come with a pre-installed drive. But, we recognize that
you may wish to upgrade or replace your drive in the future so this DVR is designed to make
installation and replacement easy for the average user.
It should be noted that while this is the only user-serviceable part within the case and you will
not void your warranty by installing or upgrading your hard disk drive, care must be taken to
avoid damage to the other components within the case.
8.1 INSTALLATION/REMOVAL
It is strongly advised against opening the case when atmospheric conditions present the risk
of static discharge which can damage electronic components.
Whether installing the drive for the first time or removing the old one to install a new one, the
steps are largely the same:
STEP 1. Disconnect the DVR from the power source as well as any other connections.
WARNING! ELECTRIC SHOCK RISK!
The DVR MUST be unplugged from all power sources as well
as from the cameras before opening the case. Failure to do so
can result in damage to the DVR or its components as well as
injury or death.
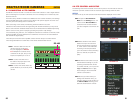
PICTURE 8-1 PICTURE 8-2
PICTURE 8-3 PICTURE 8-4
PICTURE 8-5 PICTURE 8-6
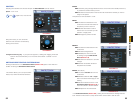
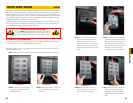
STEP 2. Insert the key in the lock and
press down. Turn clock-wise 90
degrees to unlock.
STEP 3. You will also need to loosen the
two thumbscrews to either side of
the lock.
STEP 4. Lift the drive cover from the
bottom and then slide it towards
the bottom of the unit. If you are
replacing a hard drive, you will need
to unscrew the four drive mounting
screws holding the drive to the cover
plate.
STEP 5. Connect the power and data
cables before attaching the drive to
the cover plate. Press firmly, but do
not force them onto the pins or you
may damage them. The connectors
are “keyed” to ensure they are
connected in the proper position.
STEP 6. Place the hard drive cover
plate on the drive lining up the four
mounting holes on both parts
STEP 7. Use the screws to attach the
drive to the cover. Recheck the
connection of the cables before
reattaching the cover panel to the
DVR.