Making connections
11
DX-32L130A10
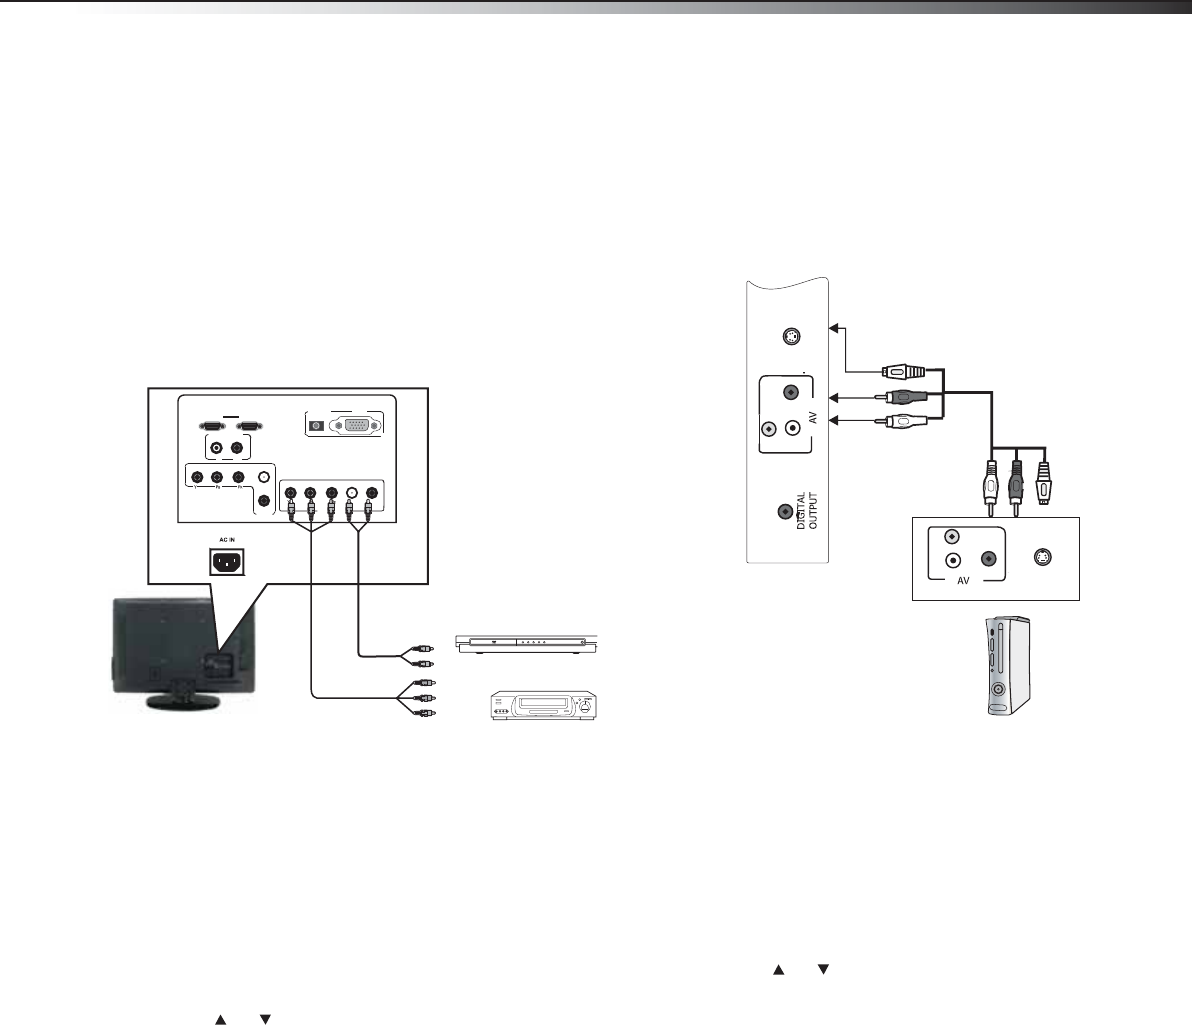
Connecting a component video device
A component (Y, Pb, Pr) picture can be displayed
only when a 480i, 480P, 720P, or 1080i signal is
received.
To connect a component video device:
1 Make sure that your TV’s power cord is
unplugged and the component video device is
turned off.
2 Connect a component video cable to the
COMPONENT OUT jacks on the component
video device.
3 Connect the other end of the component video
cable to the COMP1 or COMP2 jacks on the
back of your TV.
4 Connect an audio cable to the AUDIO OUT
jacks (L/R) on the component device.
5 Connect the other end of the audio cable to the
COMP1 or COMP2 audio jacks on the back of
your TV.
To play from a component device:
1 Turn on your TV, then press INPUT. The INPUT
SOURCE menu opens.
2 Press or to select COMP1 or COMP2, then
press ENTER.
3 Turn on the component video device and set it
to the correct output mode. See the component
video device’s user guide for more information.
Connecting an S-video device
To connect an S-video device:
1 Make sure that your TV’s power cord is
unplugged and the S-Video device is turned off.
2 Connect an S-Video cable to the S-VIDEO OUT
jacks on the S-Video device.
3 Connect the other end of the S-video cable to
the S-VIDEO jack on the side of your TV.
4 Connect an audio cable to the AUDIO OUT
jacks (L/R) on the component device.
5 Connect the other end of the audio cable to the
AV audio jacks on the back of your TV.
To play from a component device:
1 Turn on your TV, then press INPUT. The INPUT
SOURCE menu opens.
2 Press or to select S-VIDEO, then press
ENTER.
3 Turn on the S-video device and set it to the
correct output mode. See the S-video device’s
user guide for more information.
HDMI2 HDMI1
COMP2
R
COMP1
AUDIO IN
VGA
VGA
L R
AUDIO OUT
Y P
B
P
R
L R
L
L
R
Back of TV
Component video cable
Component video devices
Note: Cables are often
color-coded to connectors.
Y = Green cable
Pb = Blue cable
Pr = Red cable
L R
VIDEO
S-VI
D
EO
L R
VIDEO
S-VIDEO
Side of TV
S-video cable
Audio cable
S-video device
DX-L32L130A10_09-0617_MAN_ENG_V1.book Page 11 Thursday, July 30, 2009 2:41 PM
