


Installation, cont’d
Digital Display Scaler • Installation2-2
Installation
Installation Overview
To install and set up a DDS 402 Digital Display Scaler for operation, perform the
following steps:
1
Disconnect power from all of the equipment, including the video source(s),
and the devices that will receive the scaled video signal.
2
Rack mount the scaler, if desired. See Mounting the Scaler in this chapter.
3
Connect the digital input and loop-through cables. See Video input connections
in this chapter.
4
Connect the digital output cables. See Video output connections in this chapter.
5
If desired, connect the RS-232 cable. See RS-232 connection and Contact closure
connection in this chapter.
6
Connect the AC power cable. See Power connection in this chapter.
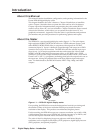
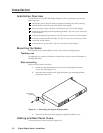
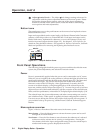
Mounting the Scaler
The DDS 402 comes with rubber feet and a set of rack mounting brackets.
Tabletop use
For tabletop use, attach a self-adhesive rubber foot to each corner of the bottom of
the DDS 402 scaler.
Rack mounting
Rack mount the scaler as follows:
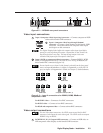
1. Attach the rack mount brackets to the scaler with eight #8 machine
screws, provided (figure 2-1).
2. Insert the scaler into the rack, align the holes in the mounting bracket
with those of the rack.
2A MAX
100-240V 50-60Hz
REMOTE
RGB/HD R-Y, B-Y, Y
RGB/R-Y, B-Y, Y
RGB
RGB/R-Y, B-Y, Y
2
1
R
/RY
G
/Y
B
/B-Y
H
V
S
R
/RY
G
/Y
B
/B-Y
H
V
S
O
U
T
P
U
T
S
I
N
P
U
T
S
Rack-mount
Bracket
Figure 2-1 — Mounting the digital display dcaler
3. Secure the scaler to the rack using the supplied machine screws.
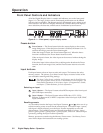
Cabling and Rear Panel Views
All connectors are on the rear panel (figure 2-2).