


Operation, cont’d
Digital Display Scaler • Operation3-2
Operation
Front Panel Controls and Indicators
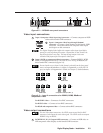
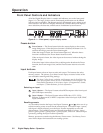
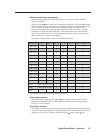
All of the Digital Display Scaler’s controls and indicators are on the front panel
(figure 3-1). The large, positive-touch, illuminated push buttons can be labeled
with text and/or graphics. The buttons are fully illuminated green, amber, or red
when selected. The 16x2 LCD display indicates the switcher status, and displays
menu selections, the data rate, and the status of additional system features.
DDS 402
DIGITAL DISPLAY SCALER
ADJUST
MENU
12
NEXT
PICTURE ADJUSTMENTS
CENTER SIZE BRT/CONT ZOOM
INPUTS
RGBFREEZE
RGB
R-Y, B-Y, Y
DETAIL
1 2 4 9 12 135 6 7 83
10 11
Figure 3-1 — Front panel, digital display scaler
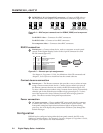
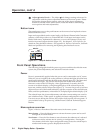
Freeze button
1
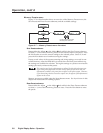
Freeze button — The Freeze button locks the output display to the current
image being input. When the freeze function is enabled, the button is lit. To
unfreeze the image, press the Freeze button again.
When the image is frozen, the Freeze button lights red. When the freeze
function is deselected, the Freeze button returns to unlit.
When an input is frozen, the video input can be removed without losing the
display image.
If the other input is then selected, the switching action deselects the Freeze
function, the frozen image is lost, and the Freeze button returns to its unlit
state.
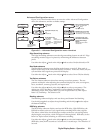
Input buttons
Each input button selects an input to scale and output. The buttons also select
memory presets. The presets, up to three for each input, are stored values of the
user-selectable centering and sizing settings.
The Input 2 video format, resolution, and frequency must be identified using
either the front panel menus, the SIS, or the Windows Control program. See
Front Panel Operations in this chapter, chapter 4, Programmer’s Guide,
and chapter 5, Scaler Software, for more information.
Selecting an input
2
Input 1 button — The Input 1 button selects RGB computer video from input 1
(the 15HD input connector).
3
Input 2 button — The Input 2 button selects RGB video, YUVi, YUVp,
Betacam 50, Betacam 60, or HDTV component video from input 2 (the 5 BNC
input connectors).
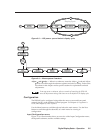
Recalling presets
As a secondary function the Input 1 and Input 2 buttons,
2
and
3
, select one of up
to three memory presets to recall for the selected input. To recall an input 1 preset,
with input 1 already selected, press the Input 1 button repeatedly to select the
desired preset. The available presets are selected sequentially in a loop: {press}
preset 1, {press} preset 2, {press} input 3, {press} input 1, and so on. Select an input
2 preset by pushing the Input 2 button repeatedly.
Memory presets are created using the Memory Presets menu. See Memory Presets
menu in this chapter for instructions on creating a preset.