


Operation, cont’d
Digital Display Scaler • Operation3-4
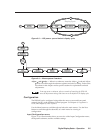
13
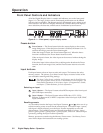
Adjust (vertical) knob — The Adjust knob changes settings when used in
conjunction with the picture adjustment buttons or the menu system. Rotate
this knob to change picture settings when one of the picture adjustment
buttons is selected. In the menu system, rotate this knob to scroll through
menu options and make adjustments.
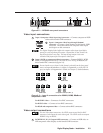
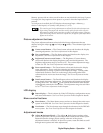
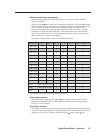
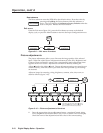
Button icons
The translucent covers on the push buttons can be removed and replaced to insert
labels behind the covers.
Input and output labels can be created easily with Extron’s Button Label Generator
software, which ships with every Extron DDS 402. Each input and output can be
labeled with names, alphanumeric characters, or even color bitmaps for easy and
intuitive input and output selection (figure 3-2). See chapter 5, Scaler Software, for
details on using the label software. See Appendix A, Reference Information, for blank
labels and procedures for removing and replacing the translucent covers.
DVD
Computer
INPUTS
RGB
RGB
R-Y, B-Y, Y
Figure 3-2 — Sample button icons
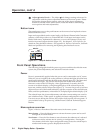
Front Panel Operations
The following paragraphs detail the power-up process and then describe the menu
system, the picture adjustments, and selection of executive mode.
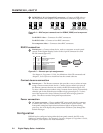
Power
Power is automatically applied when the power cord is connected to an AC source.
When AC power is applied, the scaler performs a self-test that lights all of the front
panel button indicators and then defaults to the selected input (lit). The Menu and
Next buttons also light. The self-test also displays the model name and the
firmware version in the LCD display. After approximately 2 seconds, the LCD
reverts to its default display, cycling through displays of the selected input, the
input rate, and the selected output rate (figure 3-3). An error-free power up self-test
sequence leaves all of the button indicators, with the exception of the selected input,
Menu, and Next pushbuttons, unlit and the LCD displaying the default display cycle.
The selected input, the picture adjustments, and other current settings are saved in
non-volatile memory. When power is applied, the latest configuration is retrieved.
If an error occurs during the self-test, the switcher locks up and will not operate. If
your switcher locks up on power-up, call the Extron S
3
Sales & Technical Support
Hotline.
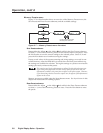
Menu system overview
Figure 3-4 shows a flowchart of the main menus in the menu system.
Menu button — Press the Menu button to activate the menu system and to scroll
through the five main menus.
Next button — Press the Next button to move between the submenus of a selected
main menu and to activate one for viewing or configuration. Pressing the
Next button while in the input configuration menu causes the current input’s
number and format type to be displayed on the LCD.