


Install the Batteries
• Before you can operate the remote control, you must first install the batteries (included).
• Push down on the remote's back cover and slide towards the bottom to remove it.
• Insert two AA batteries (supplied), carefully noting the %" and "-" markings on the batteries
and on the remote control. To avoid a potential short circuit, insert the "=" end first. Be sure to
use only size AA batteries.
• When batteries are installed, slide the cover back into place (until it clicks into position).
• If the remote control acts erratically, replace the batteries. Typical battery life is six months to
one year. We recommend using alkaline batteries for longer battery life.
• When you change the batteries, try to complete the task within three minutes. If you take
longer than three minutes, the remote control codes for your VCR, DVD, and/or Cable Box
may have to be reset (pages 22-24).
,_5,_:_b, o 2o3
0 _ d)_ 0 _
°_ 0 _ 0 _ 0 _
0000
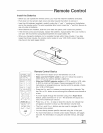
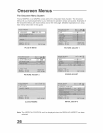
Remote Control Basics
Press the POWER button to turn the television on or off.
Make sure the TV/OATV switch is set to TV. Move the switch to
CATV only if you need to operate a cable box.
Slide the VOR/DVD eeJeetor switch to VCR to control a VCR, slide
to DVD to control a DVD player. Please see pages 22 to 24 for
instructions on programming your remote control to operate a Cable
box, VCR or DVD player.
Press the CH+ and CH= buttons to scan through the channels. Tap
the CH+ or CH- button to move through the channels one channel at
a time.
To move rapidly through the channels using JVO's Hyper Scan
feature, press and hold CH+ or CH=. The channels will zip by at a
rate of five channels per second.
Press VOL+ or VOL - to raise or lower the volume. An indicator bar
will appear onscreen to show you the television volume level.
The OH+,/- and VOL+/- buttons are also used to navigate JVC's
onscreen menu system.
You can directly access specific channels using the 10=key pad.
For more information on remote control button features, see pages
53 to 59. For information on using the onscreen menus, see page
26.