


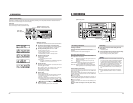


28
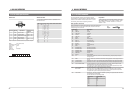
9 TIME CODE
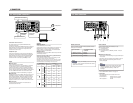
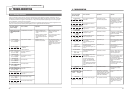
Set the menu switches.
(
੬
See page 20.)
5
Set the No. 414 <TCG SELECT> menu switch to
“PRESET”.
5
Set the No. 415 <TCG MODE> menu switch.
Setting is not necessary for user bits.
REC RUN: The time code is counted only during
recording.
FREE RUN: The time code is counted after the preset
is complete.
5
Set the No. 416 <NON DROP/DROP> menu switch.
Setting is not necessary for user bits.
NON DROP : Engages the Non-Drop Frame mode.
DROP : Engages the Drop Frame mode.
Press the [HOLD] button to engage the time code
setting mode.
[The uppermost digit blinks.
Press the [ADVANCE] button to change the value.
[The blinking number increases.
• Hold down the [SHIFT] button and press the
[ADVANCE] button to reset all digits to
“0”.
Press the [SHIFT] button to change the digit.
[The blinking cursor on the digit moves to the right.
To change the digit, repeat steps
to
.
Press the [PRESET] button to enter the value.
[The time code setting mode is released and the
normal display is restored.
To check the preset time code, press the [REC]
button in the Stop mode.
HMSF
HMSF
HMSF
HMSF
HMSF
(U MODEL)
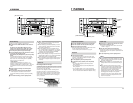
29
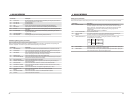
PHONES
MIC
REMOTE
LOCAL
EJECT
OPERATE
REC LEVEL
CH-2/4
CH-1/3
SHIFT
SET
SELECT
SHIFT
MENU
HOLD
AUDIO
MONITOR OUTPUT COUNTER
SHIFT A. DUB
ADVANCE PRESET
L CTL
TC
UB
CH-1/2
CH-3/4
R
MIX MIX
REW STOP FF
REC PLAY
PAUSE
ON/OFF
MENU
OVER
OVER
HMSF
AUD LOCK
SP
32k 48k
SLAVE PB NDF
SERVO RF
DEW
AUTO OFF
HOLD
CH 2/4
CH 1/3
VIDEO CASSETTE RECORDER BR-DV600U
dB40 30 20 10
0
9 TIME CODE
[COUNTER] switch
[REC] button
[PLAY] button
[STOP] button
Recording
Time code can be recorded in the following ways.
5
Time code recording starts from the preset data.
5
Time code recording follows the time code already recorded on the tape.
5
Time code recording follows the time code already
recorded on the tape.
Menu switch setting
No. 414 <TCG SELECT>
“REGEN”
No. 415 <TCG MODE>
“REC RUN” or “FREE RUN”
No. 416 <NON DROP/DROP>
“NON DROP” or “DROP” (U
MODEL)
Operation
Start recording.
While pressing the [REC] button, press the [PLAY]
button.
[The time code and user bits are recorded following
the data recorded on the tape.
The time code data is shown on the on-screen display
and counter display. On the on-screen display, the
counter mode is shown as
“TCR” or “UBR”.
To stop recording, press the [STOP] button.
5
Time code recording starts from the preset data.
Menu switch setting
No. 414 <TCG SELECT>
“PRESET”
No. 415 <TCG MODE>
“REC RUN” or “FREE RUN”
No. 416 <NON DROP/DROP>
“NON DROP” or “DROP” (U
MODEL)
Operation
Check the preset value.
Set the [COUNTER] switch to
“TC” or “UB”.
In the Stop mode, press the [REC] button.
[Time code data is shown on the on-screen display
and counter display. On the on-screen display, the
counter mode is shown as
“TCG” or “UBG”.
Release your finger from the [REC] button to restore the
previous display.
Start recording.
While pressing the [REC] button, press the [PLAY]
button.
[Time code and user bits are recorded.
To stop recording, press the [STOP] button.
Reference
Playback time code
Time code data is recorded in the sub code area of the
tape. During playback, the data in the sub code area is
processed in the LTC time code format and output to the
[TIME CODE OUT] connector.
Playback
Operation
Select the time code data to be displayed.
Set the [COUNTER] switch to
“TC” or “UB”.
[The counter display shows the time code or user bits.
Press the [PLAY] button to play back the time code
and user bits.
LTC time code is output from the rear panel
’
s [TIME
CODE OUT] connector. VITC time code is not output.
The time code data is shown on the on-screen display
and counter display. On the on-screen display, the
counter mode is shown as
“TCR” or “UBR”.
To stop playback, press the [STOP] button.
Note on time code playback without user bits
5
When you play back a tape that has no user bits recorded
(for example, a tape recorded on a consumer MiniDV VCR),
the user bits that were played back last will be displayed.