


HELIX DN9340E/DN9344E Remote Control Software
User Guide
26 of 65
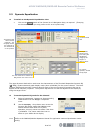
7 USING HELIX RCS TO CONTROL AN EQUALISER NETWORK
7.1 Overview
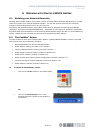
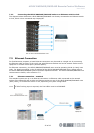
To control an equaliser network, the laptop/PC running HELIX RCS is connected to the network in place
of a Master DN9340E HELIX, assuming control of the daisy-chained HELIX units under pre-set slave
addresses. The following options for connecting the laptop/PC to the HELIX unit(s) are available:
Ethernet: Covers direct Ethernet, Local Area Network or wireless connection, converting to an
RS-232 front panel input via a Lantronix UDS1100 Converter. Wireless offers
increased flexibility during the event set-up, as the engineer can move around freely
with a laptop and adjust the equalisation while listening to the end effect at any place
in the venue.
Serial (option): The optional RS-232 serial connection is via the “PC PORT” on the front panel of the
first HELIX unit. It is possible to connect other HELIX DN9340E/DN9344E units via
the rear Ethernet port(s) when using a serial connection, but note that this will be
slower that using Ethernet.
The following sections describe how to connect the master HELIX DN9848E RCS laptop/PC to the system
for each option and also the interconnectivity of the HELIX DN9340E/DN9344E units.
Note
If Solo Tracking input is required, the first slave HELIX must be a DN9340 and the front panel
RS-232 PC Port must be used.
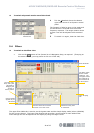
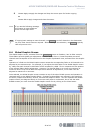
7.2 HELIX DN9340E/DN9344E unit interconnections
The HELIX DN9340E/DN9344E units in your system can be connected together in a “daisy chain”, or
each one can be connected to an Ethernet switch or hub.
Note When connecting the Ethernet cable to the rear panel of a HELIX DN9340E/DN9344E unit,
either of the Ethernet sockets can be used.
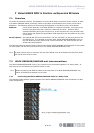
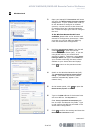
7.2.1 Connecting the HELIX DN9340/DN9344E units in a daisy chain
The diagram below shows a typical example of the HELIX DN9340/DN9344E units connected in a daisy
chain configuration.