


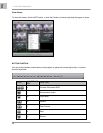

Lorex Client Application
53
ENG
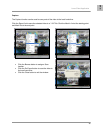
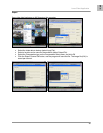
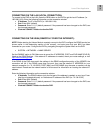
CONNECTING ON THE LAN (LOCAL CONNECTION):
To connect to the DVR on the LAN, press the REW button on the DVR to get the local IP address (i.e.
192.168.0.104). Enter the following information on the connection window:
• IP Address: The IP of the DVR (i.e. 192.168.0.104)
• Port: Enter 8841 (default)
• Password: Enter 111111 (default password. If the password has been changed on the DVR, use
the changed password).
• Click the CONNECT Button to view the DVR.
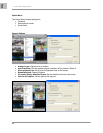
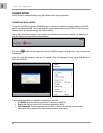
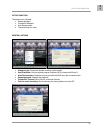
CONNECTING ON THE WAN (REMOTELY OVER THE INTERNET):
NOTE: Before starting the Viewer Mode to remotely connect to the DVR, configure the DDNS service (as
shown earlier in the Networking section of this manual), and make sure that port 8841 has been
forwarded on your router. Configure the DVR by navigating through the System Menu on the DVR:
• SYSTEM -> NETWORK -> NAME SERVER
Set the ENABLE option to ON. Make sure to record the IP ADDRESS, PORT and DVR NAME (DVR ID)
listed on the DDNS Settings. If the external IP addresses is needed, check your router settings, or visit
http://www.whatismyip.com
If the DDNS of the DVR does match the settings in the DDNS configuration portion of the VIEWER, the
connection will fail. If the DDNS name does not work, then use the external IP ADDRESS for your
network connection (i.e. 74.134.55.22) PORT (8841) and DVR NAME (any character or number) can be
used instead. Please see the network section of this manual for information on locating the external IP
address.
Enter the following information on the connection window:
• IP Address: The DDNS Address (only the first part of the address is needed, so use ‘myurl’ from
http://myurl.strategicvista.net) -or- the external IP address of the DVR (i.e. 74.134.55.22)
• Port: Enter 8841 (default)
• Password: Enter 111111 (default password. If the password has been changed on the DVR, use
the changed password).
• Click the CONNECT Button to view the DVR.