


QLR0440 SERIES QSG_EN_R3
Page 8
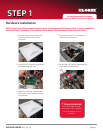
STEP 7
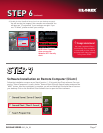
Congratulations!
You have completed Step 8
successfully. Your computer
is now ready to view, record
and play back video remotely
using Lorex DDNS.
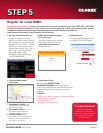
Enable DDNS (on VistaPro4 Client Software)
NOTE: Please make sure that VistaPro4
Server Software is running while configuring
the VistaPro4 Client Software.
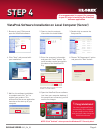
1. Double click on the VistaPro4
Client icon from your
desktop to open the Client
software and click on the
“Setup” icon.
2. On the “Select Setup System”
screen and from under “System”
you will see “Local” selected by
default. Press the “Ok” button.
3. Once you press the “OK” button, you
will be prompted to enter “User
Confirm” password. Type “1111”
(default password) and press the
“OK” button.
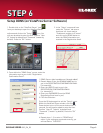
5. On the “Setup” screen and within
the “Server Registration” tab, select
the server name you created (e.g.
office) and press the “OK” button.
4. From within the “Setup” screen,
click on the “Server Registration”
tab and within “Server
Information”, click on the
Registration button to complete
the Server Registration.
1. Server Name: Type any name
(e.g. Office)
2. IP/DDNS Name: Enter the
DOMAIN NAME sent to you in the
REGISTRATION CONFIRMATION
EMAIL (i.e.tomsmith)
3. Video port by default is 2000.
4. USER ID (by default is admin).
5. Click the OK button.
1
2
3
4
5
tomsmith
admin
6. On the VistaPro4 software screen,
press the
“Connect” button.
On the “Remote Connection”
screen, choose the Server name
you created (e.g. Office). IP/DDNS
name will already be filled out.
The default User ID is “admin”
and Password is “master”. Press the
“Connect” button to connect to the
remote live site.
Office
tomsmith
(continued)