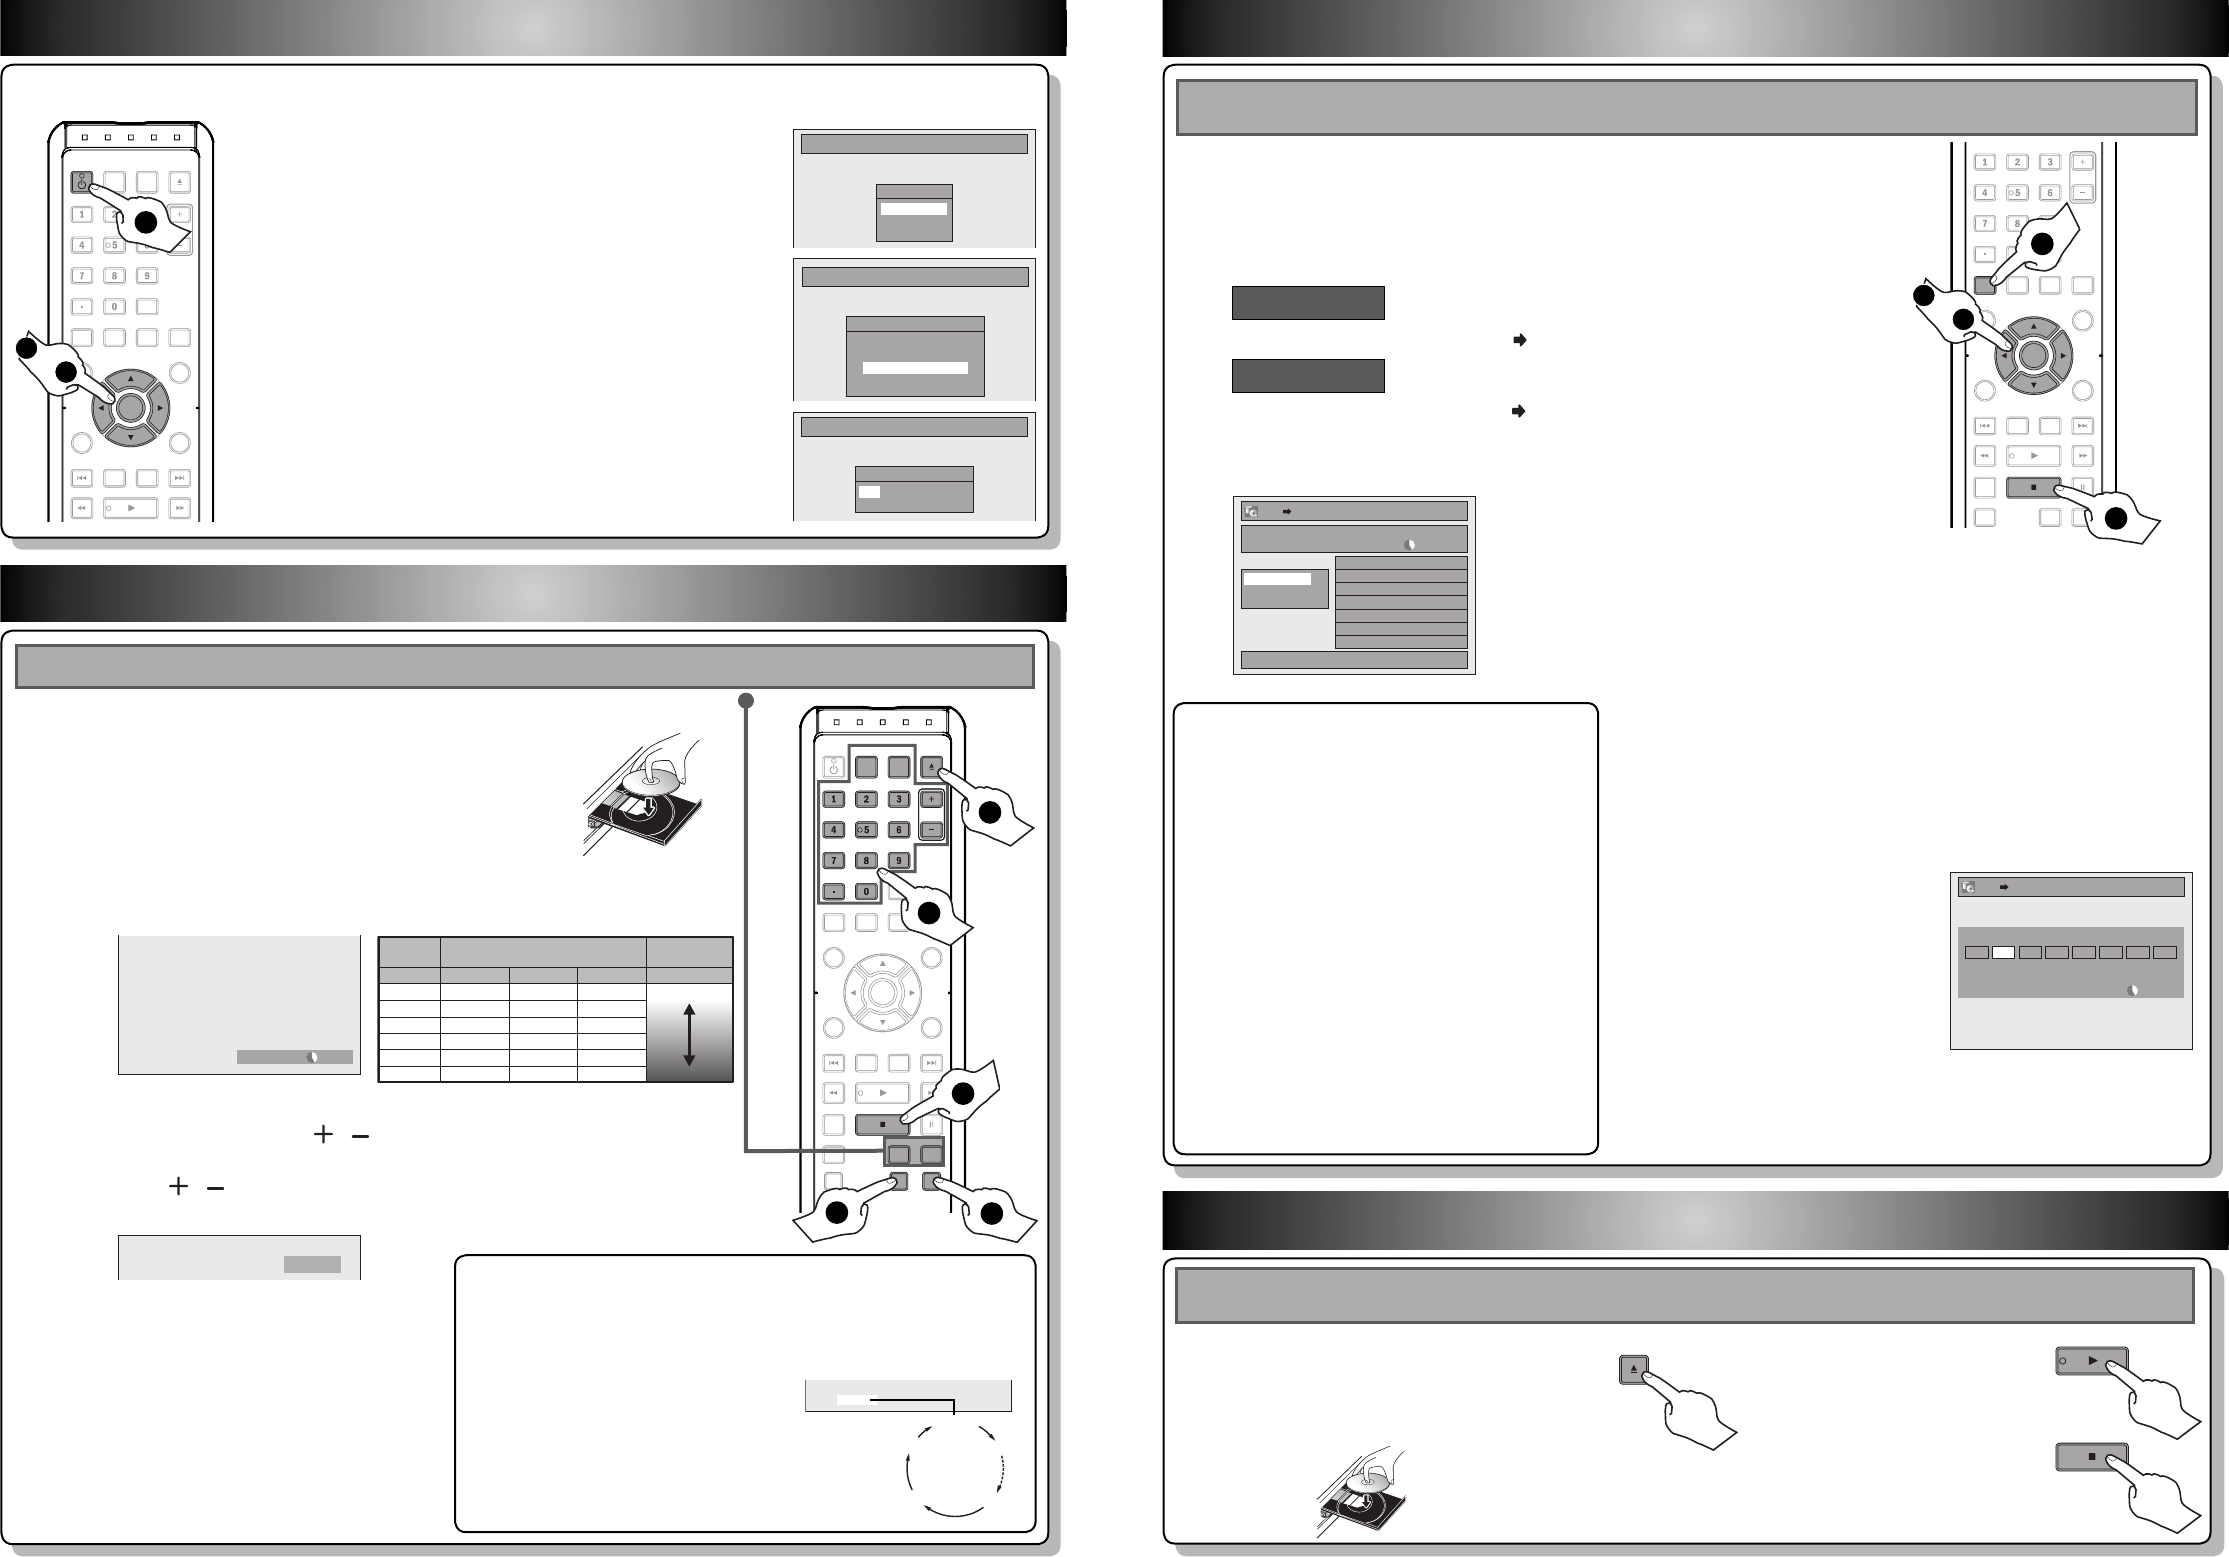
3 Basic Recording
5 Direct Playback
1
2
Press [REC MODE] to select a recording mode.
Press [OPEN/CLOSE
A
] to open the disc tray.
Place the disc properly. Press [OPEN/CLOSE
A
]
again to close the disc tray.
4
Press [REC] to start recording.
3
Select the appropriate external input channel by pressing
[SOURCE] or [CHANNEL / ].
Press [DTV/TV] to select analog TV or digital TV, then use
[CHANNEL / ] or [the Number buttons] and [ • ] (for digital
TV channels) to select a desired channel to record.
2
Use [
K
/
L
] to select “Dubbing”, then press [OK].
4
Use [K / L] to select “Add”, then press [OK].
5
Use [K / L / s / B] to select a desired title, then
press [OK].
The title is now registered in the dubbing list.
1
Press [SETUP] in stop mode.
2 Initial Setting
5
Press [STOP C] to stop recording.
* Make sure the disc is compatible with this unit. (Refer to page 39
in the owner's manual for the list of compatible discs.)
If you are recording to the HDD, press [HDD] first, then proceed to step 2. If you are recording to a disc, press [DVD] first.
18 min
36 min
45 min
54 min
72 min
108 min
60 min
120 min
150 min
180 min
240 min
360 min
HDD (Internal)
HQ
SP
SPP
LP
EP
SLP
Video/sound
quality
Recording
mode
Recording time
8cm Disc 12cm Disc
30 hrs
60 hrs
75 hrs
90 hrs
120 hrs
180 hrs
Good
Poor
To set one-touch timer recording (OTR)...
This is a simple way to set the recording time in blocks of 30 minutes.
Press [REC] repeatedly until the desired recording time (30 minutes to
6 hours) appears on the TV screen.
One-touch timer recording will start.
To change the recording length during
the one-touch timer recording:
Press [REC] repeatedly until the desired
length appear.
To cancel the one-touch timer recording
within the specified time:
Press [STOP C].
0h30m
(normal recording)
6h00m
5h30m
1h00m
4 Basic Dubbing
3
Use [K / L] to select “HDD DVD”, then press [OK].
HDD to DVD
DVD to HDD
Use [K / L] to select “DVD HDD”, then press [OK].
HDD DVD
1/1
3000 MB
Dubbing List
Add
Delete All
Dubbing Start
6
Repeat steps 4 to 5 until you register all the
titles to be dubbed.
7
After adding all the titles you want, use [K / L]
to select “Dubbing Start” in the dubbing menu,
then press [OK].
8
Use [s / B] to select a
desired recording mode,
then press [OK].
9
Use [K / L] to select “Yes”, then press [OK].
Dubbing will start.
To stop the dubbing in progress, press [STOP C] on the front panel
or press [STOP C] for 2 seconds on the remote control.
Preparing for dubbing (HDD to DVD):
• Insert a recordable DVD.
Preparing for dubbing (DVD to HDD):
• Insert a disc to be dubbed.
One-touch Dubbing...
With one-touch dubbing, you can start dubbing right
away with just one touch.
To dub the contents in a DVD which is finalized on
other unit, use this function.
During playback of the title you want to dub, press
[D.DUBBING].
If you are playing back a DVD, DVD to HDD dubbing will
start right away.
If you are playing back HDD, HDD to DVD dubbing will
start right away.
• The dubbing will start from the beginning of the title
being played back.
• The unit will dub only the title being played back.
• When dubbing from HDD to DVD, recording mode will
automatically be set to “High” whenever the conditions
are met (refer to page 49). Otherwise, the last selected
recording mode will automatically be applied.
To stop the dubbing in progress:
Press [STOP C] on the front panel or press [STOP C] for
2 seconds on the remote control.
You need to follow these steps when you turn on this unit for the first time.
1
Press [STANDBY-ON y].
Turn on the TV. Select the input to which the unit is
connected.
2
Use [K / L] to select your desired language, then press
[OK] to set language.
3
Use [K / L] to select the type of broadcasting signal,
then press [OK].
The unit will start getting channels available in your area.
4
Use [{ / B] to select an item to set, and use [K / L] to
select the contents to suit your preference, then press
[OK].
Initial Setup
OSD Language
English
Français
Español
Initial Setup
Clock Setting
JAN / 01 / 2008 ( TUE )
12 : 00 AM
Initial Setup
Channel Preset
Make sure the antenna is
connected to “ANTENNA IN” jack.
Antenna
Cable (Analog)
Cable (Analog / Digital)
OPEN/
CLOSE
SOURCE
HDMI
.@/: ABC
GHI
PQRS TUV
SETUP REPEAT
DISPLAY
AUDIO
DISC MENU
RETURN
TITLE
WXYZ
CLEARSPACE
JKL MNO
DEF
OK
V.REPLAY V.SKIP
DTV/TVSTANDBY-ON
CHANNEL
OK
STANDBY-ON
1
2
to
4
OPEN/
CLOSE
SOURCE
HDMI
.@/: ABC
GHI
PQRS TUV
SETUP REPEAT
DISPLAY
AUDIO
DISC MENU
RETURN
TITLE
WXYZ
CLEARSPACE
JKL MNO
DEF
OK
DVDHDD
D.DUBBING
V.REPLAY V.SKIP
RAPID PLAY
RECREC MODETIMER
DTV/TVSTANDBY-ON
CHANNEL
.@/: ABC
GHI
PQRS TUV WXYZ
SPACE
JKL MNO
DEF
CHANNEL
DTV/TV
RECREC MODE
DVDHDD
SOURCE
OPEN/
CLOSE
3
2
5
1
4
2
Press [PLAY
B
] to start
playback.
If you are playing back the titles in HDD, press [HDD] first, then proceed to step 2. If you are playing back the titles in
disc, press [DVD] first.
1
Press [OPEN/CLOSE
A
] to open the
disc tray. Place the disc properly. Press
[OPEN/CLOSE
A
] again to close the disc
tray.
* Make sure the disc is compatible with this
unit. (Refer to page 63 in the owner's
manual for the list of compatible discs.)
3
Press [STOP C] once to
stop playback temporarily.
• Refer to “Resume Playback” on page 70.
OPEN/
CLOSE
HDD DVD
3000 MB
500 MBDubbing Titles
Please select REC MODE.
LP EP SLP AutoHigh HQ SP SPP
e.g.) HDD ➡ DVD
HDMI
.@/: ABC
GHI
PQRS TUV
SETUP REPEAT
DISPLAY
AUDIO
DISC MENU
RETURN
TITLE
WXYZ
CLEARSPACE
JKL MNO
DEF
OK
DVDHDD
D.DUBBING
V.REPLAY V.SKIP
RAPID PLAY
CHANNEL
OK
SETUP
1
2
to
9
9
E2M01UD_H2160MW9_QG.indd 2E2M01UD_H2160MW9_QG.indd 2 2008/04/15 19:21:302008/04/15 19:21:30


