


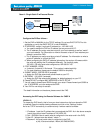

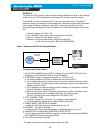
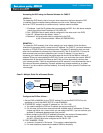
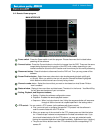
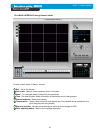

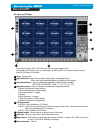


39
- Power switch : Press the Power switch to exit the program. Please disconnect the live feed before
powering off the software
- Connect button : Press the Connect button to view the live images from the DVR. These are the same
images being displayed on the monitor of the DVR, with a delay depending on your
internet connection at both the DVR location and from where you’re currently accessing.
- Disconnect button : Press this button to disconnect from the DVR unit. Then you may power off the
software.
- Screen Division button : Select how many channels to view simultaneously(single,4-split,9-split,
or 16-split). When you select a view you will see the Channel Numbers highlighted
which determine what channels are currently being viewed.
- Channel number button : Select the channel that you want to view based on what Screen Division
view is enabled.
-Statuswindow: Display’s the current time and date based. The date is in the format : Year/Month/Day.
You will also see the status of your connection.
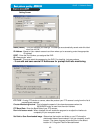
- Setting, Playback, and Sequence buttons ;
a. Setting : Enables the software configuration screen.
b. Playback : Enables the remote playback screen.
c. Sequence : When in single channel view, hitting the sequence button will sequence
through all active channels at a speed specified in the settings menu.
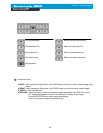
- PTZ control : You can control a PTZ camera via the software with these controls.
a. First, you must input or configure the specific PTZ protocol into the software in
order to communicate with the PTZ device.
b. When you press any of the controls for the PTZ, please press and hold the button
for 1-2 seconds per instance to compensate for the data transmission rate. If you
do not and instead simply click the PTZ buttons, you may get undesired results
(having the requested operation transmitted repeatedly, regardless of your intention).
c. The plus and minus buttons send the PTZ commands to the corresponding PTZ
camera ID.
1
2
3
4
5
6
7
1
2
3
4
5
6
7
8
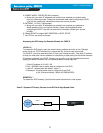
CHAP. 6 Network Setup
6-2. Remote Viewer program
8
MAIN INTERFACE