


8
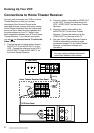
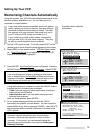
2 Connect a yellow video cable to VIDEO OUT
on the VCR. Connect the other end to the
VCR 1 VIDEO INPUT on the Home Theater
Receiver.
3 Connect a yellow video cable to the
MONITOR OUT of the Home Theater
Receiver. Connect the other end to the
VIDEO INPUT on the back of the TV.
4 See your Home Theater Receiver Owner’s
Guide for information concerning audio
connection between TV and Home Theater
Receiver, or additional hookups and
operations.
IMPORTANT
You may need to purchase two sets of
audio/video cables for this hookup.
Connections to Home Theater Receiver
INPUT 1
S-VIDEO
VIDEO
L (MONO)
R
AUDIO
R
VCR 1 VCR 2 TV
AUDIO
OUT IN OUT IN IN
VCR2 MONITORVCR 1
OUT IN OUT IN OUT
VIDEO
L
R
L
R
OUT
AUDIO
L
R
VIDEO
OUT
R
L
L
R
Yellow
Yellow
Yellow
Yellow
TV Rear Panel
VCR Rear Panel
Home Theater Receiver Rear Panel
White
Red
White
Red
You may wish to connect your VCR to a Home
Theater Receiver so that you can take
advantage of the Surround Sound audio
recordings that are common with many movies.
Home Theater Receivers often will control both
the sound that is heard from the speakers and
the picture shown on your TV. Below is the
basic connection between your VCR and Home
Theater Receiver. If you use this connection,
you will not use Connections to TV with Audio
Video Inputs.
1 Connect the red and white audio cables to
AUDIO OUT R and AUDIO OUT L on the
VCR. Connect the other end to the VCR 1
AUDIO INPUT R and AUDIO INPUT L on
the Home Theater Receiver.
Hooking Up Your VCR