


User’s Manual
16
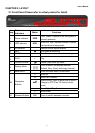
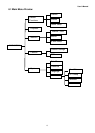
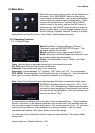
6.2 Main Menu
Right-click the mouse, a pop-up menu will be displayed on
the screen. Click “MAIN MENU” button on the pop-up
menu to enter into Main Menu. You can also use the Menu
button on the front panel to open the Main Menu. When
using the front panel buttons, use the FWD and REW
button to move in the menu, and use the SEL button to
select the icon. Use the ESC button to return to previous
window. In Main Menu, you can change settings such as
Record Settings, Playback, Network, Camera, or System
settings such as Hard Disk Drive, Video Output, System Maintenance etc.
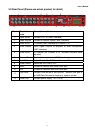
6.2.1 Recording Functions
6.2.1.1 Record Setup
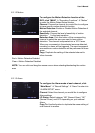
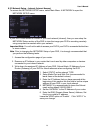
Select Main Menu Record Settings Record
Functions to open the RECORD SETUP menu. The
adjustable options are as follow:
Record: Allows you to turn each channel ON/OFF.
Audio: Allows you to Enable/Disable the audio port if you
have audio enabled camera installed.
Quality: Choose between “Good”, “Better”, and “Best”
resolution.
Copy: Use this option to duplicate the setting of one channel to another
File Size: Set the file size limit of each recorded clip.
Framerate: Choose the frame rate of your recording.
Resolution: Choose between “D1” (Highest), “HD1” (Mid), and “C1F” (Low) resolutions.
REC. MODE: Choose between Time Schedule Record or Continuous. Time Schedule will
allow you to set motion detection or record at a specific time of day/night.
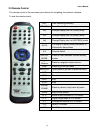
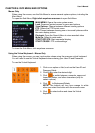
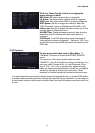
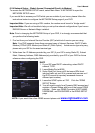
Note: Select Time Schedule Record and the select Schedule to access the below menu.
SCHEDULE recording options include ALL, CH-1, CH-2,
CH-3, CH-4…CH-16 respectively. Please select the option
you need to record according to the schedule, the channel
you have set will be highlighted in “Blue” and channels you
have not set will be “Grey”.
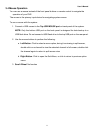
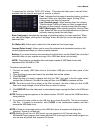
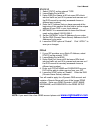
To setup weekly schedules, click on the box of the corresponding time. Choose between
Motion, Continuous, or No Recording and then click on each box in the schedule time line
that you want to apply the select record type to. You can also use the “From – To” pull-down
menus and Copy button to copy settings from one day to another. After you have
completed the schedule, click “Apply” button to save the settings.
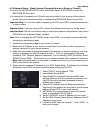
You can also click on the Default button to use the system defaults. The system default
settings are:
Alarm all time on = Motion Detection = ON