User’s Manual
23
6.2.5 Network Setup – Global Access (Connected through a Router or Firewall)
To access the NETWORK SETUP menu, select Main Menu NETWORK to open the
NETWORK SETUP menu.
If you would like to access your DVR while you are outside of your home or office network,
please follow the instructions below to configure the NETWORK Setup of your DVR
Important Note: You will not be able to access your DVR if your DVR is connected behind two
or more routers.
Important Note: If you are using a DSL modem, the modem must be set to “bridge mode”.
Important Note: We will not be able to help you set up the network configurations if you have a
RADIUS Server or Network Magic installed.
Note: Prior to changing the NETWORK Setup of your DVR, it is strongly recommended that
you perform the following tasks:
1. Access the configuration page of your router or Firewall.
2. Reserve an IP Address in your router or firewall that is not used by other computers or
devices connected to your internal network.
3. Make sure your router is configured properly for computer or devices outside of your local
network to access your DVR through your router. To do so, please use the following
method(s): NAT (Network Address Translation), Port Forwarding, DMZ (De-Military Zone),
DDNS (Dynamic DNS). Please refer to your router or firewall user’s manual for reference.
Note: Improper configuration on the router or firewall will prevent you from accessing your
DVR from outside your network.
4. Write down the assigned IP Address of your DVR, Subnet Mask, IP Address of your Router
(Gateway) of your DVR for future reference when configuring the DVR.
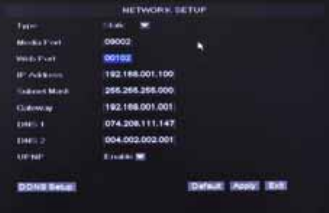
1. Select STATIC as the network TYPE.
2. Leave Media Port at 9000
3. Setup Web Port (leave at 80 but some ISPs block
inbound traffic on port 80 to prevent web servers so if
the DVR cannot be remotely accessed choose a
different port number)
4. Enter the IP Address that you have reserved at the
beginning of this section into this field to be the unique
address of your DVR in your local network.
5. NETMASK: It is recommended to leave the Subnet
mask as the default 255.255.255.0.
6. Set the GATEWAY to the IP Address of your router.
7. Set the DNS (Domain Name Server) Address to the IP
Address of your router.
8. Leave the UPNP option at “Enable”. Click “APPLY” to
save your changes


