


40
Once your Media Library has been updated with the music
from your DMS4 Digital Music Server you can update your
portable player as follows:
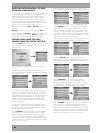
Click the Copy to CD or Device option from the Media
Player toolbar.
Select the Album, Artist, Genre or Playlist you wish to
copy from the Items to Copy list.
Under Items on Device select your portable player.
Click the Copy button.
The transfer process will begin shortly afterwards.
NETWORK BACK UP AND RESTORE
In the unlikely even that your DMS4 Digital Music Server develops
a fault you have the option to back up the contents of your DMS4
Digital Music Server’s hard disk to a selected location on your
home network and then restore this information at a later date.
In order to use Network Back Up and Restore, it is first
necessary to configure the appropriate settings on your DMS4
Digital Music Server.
Press the
J
Menu key on your DMS4 Digital Music Server
remote control to display the Main Menu.
Use the
U
and
V
keys to highlight Set Up and press the
O
Select key.
Use the
U
and
V
keys again to choose Settings and
press the
O
Select key.
Use the
U
and
V
keys a third time to highlight Network
Back Up Settings and press the
O
Select key.
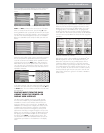
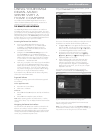
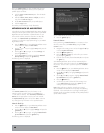
The following screen is displayed:
Fig. 8-5 DMS4 Remote User Interface Network Back-Up and Restore
screen
In the Remote Location field, enter the location on the
network to which you wish to back up your Library (e.g.
\\192.168.0.1\Share). Enter Username, Password and
Domain where appropriate to access your home network.
The Replace Back Up option can be set to True to overwrite
any existing back up information in the specified location.
Network Back Up
Press the
J
Menu key on your DMS4 Digital Music Server
remote control to display the Main Menu.
Use the
U
and
V
keys to highlight Settings and press the
O
Select key.
Use the
U
and
V
keys again to highlight Network Back
Up and Restore and press the
O
Select key.
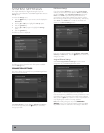
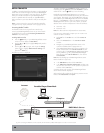
The following screen is displayed:
•
•
•
•
•
•
•
•
•
•
•
Fig. 8-6 DMS4 Remote User Interface Network Back-Up screen
Press the
O
Back Up key.
Network Restore
Prior to performing a Network Restore, it is necessary to clear
all of the content from your Audio Library, using the Clear
Content function.
Navigate to the Settings menu and use the
U
and
V
keys
to choose System Information.
Press the
M
Reset System key.
Press the
M
Clear Content key and confirm your intention
by pressing the
O
Yes key.
Enter the case sensitive password ResetMyMusic and press
the
O
Yes key.
Your DMS4 Digital Music Server will now automatically shut
down and restart, erasing the contents of your Audio Library in
the process. You are now in a position to perform a Network
Restore.
Press the
J
Menu key on your DMS4 Digital Music Server
remote control to display the Main Menu.
Use the
U
and
V
keys to highlight Settings and press the
O
Select key.
Use the
U
and
V
keys again to highlight Network Back
Up and Restore and press the
O
Select key.
Press the
M
Restore key.
Confirm that you wish to delete all of the existing music
in your Audio Library by pressing the
O
Yes key and
entering the password ResetMyMusic.
Note: When performing a back up, ensure there is enough
space available at the destination for the quantity of media being
transferred. In the event that there is not enough hard disk space,
the back up will not complete successfully and the partially backed
up files will be unusable.
•
•
•
•
•
•
•
•
•
•