


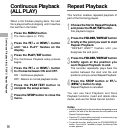

9
Setting Time/Date
(TIME&DATE)
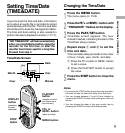
If you have set the time and date, information
as to when an audio file is recorded is stored
automatically with that file. The time and date
should be set to ease file management tasks.
The time and date setting is also needed to
perform the alarm playback function (☞ P.17).
“SET TIME&DATE” will flash automatically
when you load batteries before using the
recorder for the first time, or after the
recorder hasn't been used for a long time.
Proceed from step 3.
Time/Date Screen
1
Press the MENU button.
The menu opens (☞ P.25).
2
Press the FF/+ or REW/– button until
“TIME&DATE ” flashes on the display.
3
Press the PLAY/SET button.
Time/Date screen appears. The hour
indicator flashes, indicating the start of the
Time/Date setup process.
4
Repeat steps 1 and 2 to set the
time and date:
Time and date setup proceeds in the order
of hour, minute, year, month, and date.
1 Press the FF/+ button or REW/– button
to set a value.
2 Press the PLAY/SET button to accept
the value.
5
Press the STOP button to close the
menu.
Notes
• If you press the STOP button during the setup operation,
the clock will use the items that were set to that point.
• You can choose between 12 and 24 hour display by
pressing the DISPLAY button while setting the hour and
minute.
• You can choose the order of the year, month, day by
pressing the DISPLAY button while setting them.
Changing the Time/Date
Month
Hour Minute
Year
Date
Setting Time/Date (TIME&DATE)
STOP
button
DISPLAY
button
(switching
the data
displayed)
FF/+ or
REW/– button
(alters a choice)
PLAY/SET
button
(accepts a choice
and moves on to
the next item)
MENU button