


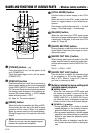

E-10
EJECT
MENU
REW
SET
FF
PLAY
STOP
REC INH.
PA L
AUDIO
NTSC
DVCAM
PAUSE
POWER
REC
A.DUB
CH
1 / 3
2 / 4
LINE
DV
S-VIDEO
OFF
9PIN
WIRELESS
INPUT
REMOTE
MIC
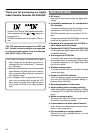
AG-DV2500
2
43
1
1
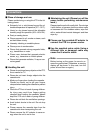
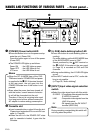
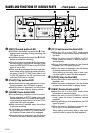
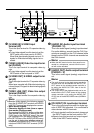
[POWER] Power button/LED
●Press this button to turn on the power and op-
erate the unit. (Power ON)
Press this button again to turn off the power.
(Power OFF)
●The POWER LED lights up as follows.
Power ON : the LED lights up green
Power OFF : the LED lights up red
VTR error : the LED blinks in red
Memo
● When the DC IN MODE item of the SYS-
TEM menu is set to “POWER ON” and power
is supplied to the
1
DC IN terminal located
at the rear panel, the unit goes into the
POWER ON state even if this button is not
pressed.
● Even when the power has been turned off
with this button, a small amount of electric-
ity will still be channeled into the unit.
Therefore, if the unit is not going to be used
for a long period of time, please remove the
AC adapter to reduce energy consumption.
2
Cassette slot
● Load a cassette into or unload it from the slot.
Please insert a standard DV or a mini DV cas-
sette. (☞ Page 29)
● When the unit is in the POWER OFF state
and if a cassette is loaded, it goes into the
ON state.
3
[A. DUB] Audio dubbing button/LED
●Press this button for audio dubbing (after-re-
cording).
For audio dubbing, set the AUDIO MODE item
of the AUDIO/VIDEO menu to “32K”.
Sound produced by the
6
MIC terminal or
the
9
AUDIO IN terminal at the rear panel
(☞ Page 15) is recorded on CH3 and CH4
channels.
●During audio dubbing, the A. DUB LED lights
up red.
●If the INPUT switch is set at “DV”, audio dub-
bing is not possible.
(☞ Page 39, “Audio dubbing”)
4
[INPUT] Input video signal selection
switch
●Select the video signal input with this switch.
S-VIDEO : YC separate video signals from the
S-VIDEO IN terminal
LINE : Composite video signals from the
LINE IN terminal
DV : DV signals from the DV IN/OUT
terminal (IEEE1394)
Note
During recording, manipulating this switch will
not bring about any effect.
NAMES AND FUNCTIONS OF VARIOUS PARTS
– Front panel –