


E-34
EJECT
MENU
REW
SET
FF
PLAY
STOP
REC INH.
PA L
AUDIO
NTSC
DVCAM
PAUSE
POWER
REC
A.DUB
CH
1 / 3
2 / 4
LINE
DV
S-VIDEO
OFF
9PIN
WIRELESS
INPUT
REMOTE
MIC
AG-DV2500
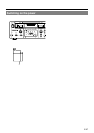
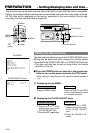
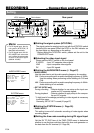
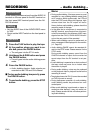
NTSC indicator PAL indicator
INPUT switch
N/OUT
DIO VIDEO
CH 2/4
LINE
S -VIDEO
N
I
O
U
T
9PIN REMOTE
AUX
NTSC PAL
DC 12V
N
G :
SHOCK HAZARD - DO NOT OPEN.
I
SQUE DE CHOC ELECTRIQUE - NE PAS OUVRIR.
NTSC/PAL switch
Rear panel
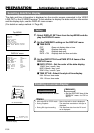
–––AUDIO VIDEO–––
AUDIO MODE 48K
AOUTATSEARCH ON
AUDIO OUT SEL CH-1/ 2
AUDIO OU T LEV NORM
SET UP(NTSC) OFF
PAGE BACK
–––SYSTEM–––
STILL MODE FIELD
SERIES REC TIME OFF
STILL TIMER 5MIN
PAUSE PROTECT F.ADV
INDEX
W
RITE ON
DC IN MODE PO
W
ER OFF
PAGE BACK
Memo
• For DV signal input, the sig-
nal system (NTSC/PAL) is
identified automatically.
• For DV signal input, the AU-
DIO MODE item cannot be
set. It will be the same mode
as that of the input signal.
(48K/44.1K/32K)
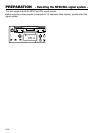
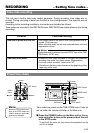
Setting
AUDIO/VIDEO menu
SYSTEM menu
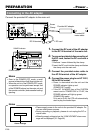
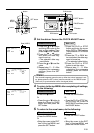
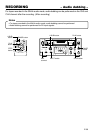
Ⅵ Setting the signal system (NTSC/PAL)
The signal system for analog input is set with the NTSC/PAL switch
located at the rear panel. Either the NTSC or the PAL indicator on
the front lights up, depending on the setting.
* Before setting the NTSC/PAL switch, please set the unit to the
POWER OFF mode.
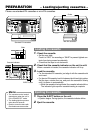
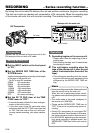
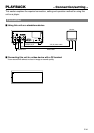
Ⅵ Selecting the video input signal
Please use the INPUT switch on the front panel.
S-VIDEO : Input Y/C separate video signals.
LINE : Input composite video signals.
DV : Input DV signals.
Ⅵ Setting the AUDIO/VIDEO menu (
☞
Page 57)
• AUDIO MODE
Use this menu item to set the audio sampling frequency for recording.
32K : Perform recording with an audio sampling frequency of 32kHz.
Use this setting when performing audio dubbing on CH3 and
CH4.
48K : Perform recording with an audio sampling frequency of 48kHz.
Audio dubbing is not available.
• SET UP (NTSC only)
During recording : Selects whether to use setup on the input com
posite and Y/C separate signals.
During playback : Selects whether to apply setup to the compos-
ite and Y/C signals.
* A high level of knowledge pertaining to video signals is necessary
to set this menu.
Generally, SETUP OFF is used.(
☞
page 57)
Ⅵ Setting the SYSTEM menu (
☞
Page 55)
• INDEX WRITE
This setting turns on/off automatic recording of index signals when
recording begins.
Ⅵ Setting the time code recording during DV signal input
Set the DV TC DUP. item of the TIME CODE menu to determine
whether to use the time code from the built in time code generator or
the data from the DV terminal. (
☞
Page 58)
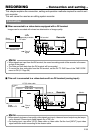
RECORDING – Connection and setting –