E-26
PREPARATION – Power –
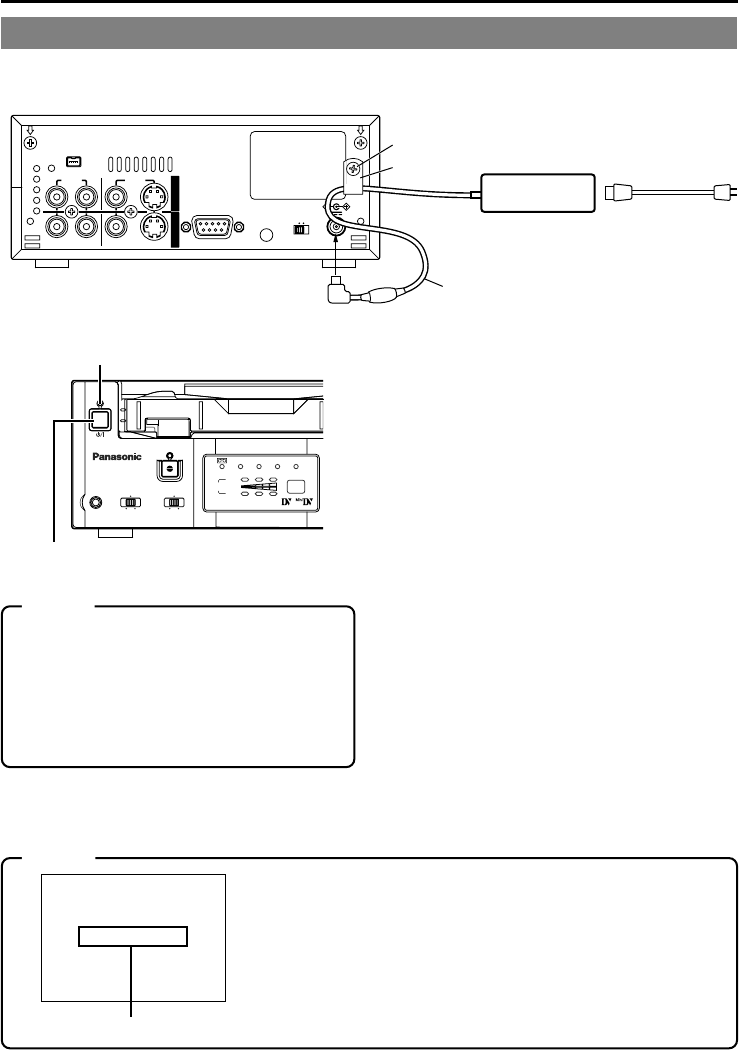
Connect the provided AC adapter to the main unit.
DV IN/OUT
AUDIO VIDEO
CH 1/3 CH 2/4
LINE
S -VIDEO
N
I
O
U
T
9PIN REMOTE
AUX
NTSC PAL
DC 12V
WARNING :
SHOCK HAZARD - DO NOT OPEN.
AVIS :
RISQUE DE CHOC ELECTRIQUE - NE PAS OUVRIR.
AC
Provided AC
mains cable
DC cord
Screw
Clamp
DC IN terminal
Provided AC adapter
REC INH.
PA L
AUDIO
NTSC
DVCAM
POWER
A.DUB
CH
1 / 3
2 / 4
LINE
DV
S-VIDEO
OFF
9PIN
WIRELESS
INPUT
REMOTE
MIC
AG-DV2500
POWER indicator
POWER button
1.
Connect the DC cord of the AC adapter
to the DC IN terminal of the main unit.
2.
To prevent accidental disconnection of
the DC cord, fasten the DC cord with a
clamp.
1Remove 1 screw followed by the clamp.
2Insert the DC cord into the clamp and fasten
the clamp unto the main unit.
3.
Connect the provided mains cable to
the AC IN terminal of the AC adapter.
4.
Connect the power plug to an AC 120 V,
50 Hz/60 Hz socket.
•Power is channeled into the unit and the
POWER indicator lights up red.
(POWER OFF mode)
• If the DC IN MODE item of the SYSTEM
menu is set to “POWER ON” or “PLAY”, the
POWER indicator will light up green.
(POWER ON mode)
If it is set to PLAY, the VTR will automatically
start to play the loaded tape.
Memo
•Even in the POWER OFF mode, a small
amount of electricity will still flow into the unit.
• When the unit is in the POWER OFF mode,
no operation can be performed except that
of the POWER buttons (on the main unit and
the remote controller) and cassette loading/
ejecting.
Notes
• Please supply power to the unit via the provided AC adapter. Do
not use other power sources.
• During recording or playback, please do not unplug the DC or
mains cable.
• When the supply voltage is low, the “LOW VOLTAGE” alarm mes-
sage will be displayed. (
☞
Page 62)
LOW VOLTAGE
Alarm message
Connecting to the AC adapter


