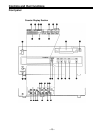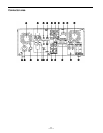
Controls and their functions
(continued)
SET button
When this is pressed, the data which has been set on the setup menu is entered. After
data entry, the setup mode is exited and the original operating mode is restored.
DIAG button
When this is pressed, VTR information is displayed. When it is pressed again, the original
display is restored.
There are two types of VTR information: “HOURS METER” information and “WARNING”
information. Swithching between these types is enabled by pressing the cursor buttons
Indicated on the “HOUR METER” screen are the power-on time, drum rotation time, tape
travel time, loading count, etc.
Indicated on the “WARNING” screen are the warnings.
VIDEO INPUT switch
This switches the video input signal.
DIGITAL: For selecting serial component digital video signal (SMPTE 259M-C)
ANALOG: recording.*
For selecting analog video signal recording.
Select the analog video signal as follows to correspond with the input signal.
Y PB PR: For recording an analog component video signal.
CMPST:
For recording an analog composite video signal.
S-VIDEO:
For recording a S-VIDEO signal.
*The optional AJ-YA750P serial interface board is necessary.
AUDIO INPUT switch
This switches the audio input signal.
DIGITAL:
For selecting serial digital audio signal (SMPTE 272M) recording.
*1
AES/EBU:
For recording a digital audio signal.
*
2
ANALOG: For recording an analog audio signal.
*
1
Both the optional AJ-YA750P serial interface board and the optional AJ-YA655P digital
audio interface board are necessary.
*
2
The optional AJ-YA655P digital audio interface board is necessary.
REMOTE/LOCAL switch
This switch is set when the unit is to be controlled from an external source using the
REMOTE connector or RS-232C connector (option).
REMOTE: Set to this position when controlling the unit by a device connected using the
9-pin REMOTE connector or RS-232C connector.
LOCAL:
Set to this position when controlling the unit using the controls on its own
operation panel.
–10–


