


18
RQT8859
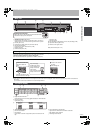
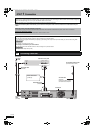
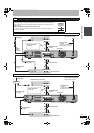
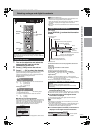
STEP 1 Connection
≥It is recommended that you use Panasonic’s HDMI cable.
Recommended part number: RP-CDHG15 (1.5 m), RP-CDHG30 (3.0 m), RP-CDHG50 (5.0 m), etc.
≥Non-HDMI-compliant cables cannot be utilised.
Preparation
1. Connect this unit to your TV or receiver with an HDMI cable (➡ 17).
2. Set “VIERA Link” to “On” (➡ 67). (The default setting is “On”.)
3. Set the “HDAVI Control” operations on the connected equipment (e.g., TV).
4. Turn on all “HDAVI Control” compatible equipment, turn the TV off/on, and then select this unit’s input channel on the connected TV so that the
“HDAVI Control” function works properly.
Also when the connection or settings are changed, repeat this procedure.
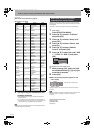
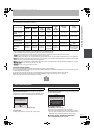
What you can do with “HDAVI Control”
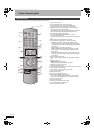
§1
This button is available only when this unit is on.
§2
When this button is pressed, the playback image is not immediately displayed on the screen and it may not be possible to watch the contents
from where playback started.
In this case, press [:] or [6] to go back to where playback started.
[Note]
≥These functions may not work normally depending on the equipment condition.
≥About “HDAVI Control” function, read the manual of the connected equipment (e.g., TV) too.
VIERA Link “HDAVI Control
TM
”
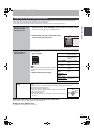
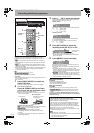
What is VIERA Link “HDAVI Control”?
VIERA Link “HDAVI Control” is a convenient function that offers linked operations of this unit, and a Panasonic TV (VIERA) or
receiver under “HDAVI Control”. You can use this function by connecting the equipment with the HDMI cable. See the operating
instructions for connected equipment for operational details.
≥VIERA Link “HDAVI Control”, based on the control functions provided by HDMI which is an industry standard known as HDMI CEC
(Consumer Electronics Control), is a unique function that we have developed and added. As such, its operation with other manufacturers’
equipment that supports HDMI CEC cannot be guaranteed.
≥This unit supports “HDAVI Control 2” function.
“HDAVI Control 2” is the newest standard (current as of February, 2007) for Panasonic’s HDAVI Control compatible equipment. This standard
is compatible with Panasonic’s conventional HDAVI equipment.
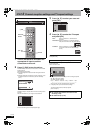
(When the TV is on)
Easy playback
When the TV is on and the following operations are performed, the TV’s input will automatically switch to HDMI input
mode and the TV displays the corresponding action.
(Picture or sound may not be available for the first few seconds.)
Press [FUNCTION MENU]
§1
, [1](PLAY)
§2
, [DIRECT NAVIGATOR], [GUIDE], [G-Code], [PROG/CHECK] etc.
(When the TV is off)
Power on link
When the TV is off and the following operations are performed, the TV will automatically turn on and displays the
corresponding action.
(Picture or sound may not be available for the first few seconds.)
Press [FUNCTION MENU]
§1
, [1](PLAY)
§2
, [DIRECT NAVIGATOR], [GUIDE], [G-Code], [PROG/CHECK] etc.
≥[DVD-V] [CD] [VCD] and MP3
The TV is automatically turned on when you insert the discs.
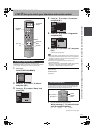
Power off link
When you set the TV to standby mode, the unit is also automatically set to standby mode. The unit is automatically
set to standby mode even if the FUNCTION MENU screen etc. is displayed during playback or when the unit set to a
timer recording.
Even if the TV is set to standby mode, the unit will not be set to standby mode at the same time when recording,
copying, finalising etc.
≥When this unit is connected to an “HDAVI Control” compatible Panasonic receiver with an HDMI cable, the receiver
will also turn off.
EX77_87GN.book Page 18 Wednesday, May 30, 2007 1:10 PM