


8
RQT9088
STEP
1
Connection
≥Before connection, turn off all equipment and read the appropriate operating instructions.
≥Refer to “Additional connections” (➡ 68) for connection using other terminals and connection with other equipment.
You can enjoy high-quality picture by changing the connection between this unit and your TV as follows.
When connected to an HDMI compatible unit, an uncompressed digital audio and video signal is transmitted. You can enjoy high quality, digital
video and audio with just one cord. When connecting to an HDMI-compatible HDTV (High Definition Television), the output can be switched to
1080p, 1080i or 720p HD video.
≥This unit incorporates HDMI
TM
(V.1.3 with Deep Colour) technology.
≥Video sources converted to 1920k1080 resolution, while of high quality, will exhibit somewhat lower subjective image resolution than true,
native 1080p full-HD sources. See dealer for details.
≥Please use High Speed HDMI Cables that have the HDMI logo (as shown on the cover).
≥When outputting 1080p signal, please use HDMI Cables 5.0 meters or less.
[Required]setting]
Set “Digital Audio Output” to “HDMI and Optical” (➡ 64). (The default setting is “HDMI and Optical”.)
[Note]
≥If you are connecting to a TV that is only compatible with 2 channel audio output, audio with 3 channels or more will be down mixed (➡ 84) and
output as 2 channels, even if connecting with an HDMI cable. (Some discs cannot be down mixed.)
≥You cannot connect this unit to DVI devices that are incompatible with HDCP.
For units compatible with HDCP (High-Bandwidth Digital Content Protection) copyright protection that are equipped with a digital DVI input
terminal (PC monitors, etc.):
Depending on the unit, images may not display properly or at all when connecting with a DVI/HDMI switching cable. (Audio cannot be output.)
When the unit is not to be used for a long time
To save power, unplug it from the household mains socket. This unit
consumes a small amount of power, even when it is turned off
[approx. 2 W (Power Save mode)]
When “Power Save” is set to “On”, the “Quick Start” function does
not work.
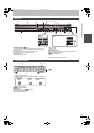
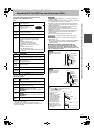
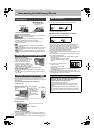
Connecting to a television with 21-pin Scart terminal
You can also connect with the AV1 terminal on this unit using the
21-pin Scart cable.
If your television is equipped with RGB input capability, by
connecting with a fully wired 21-pin Scart cable you can see video
using RGB output on this unit.
[Required]setting]
“AV1 Output” in the Setup menu (➡ 64)
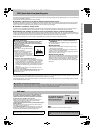
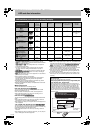
Connecting a television
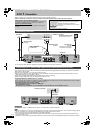
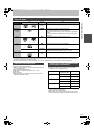
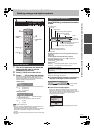
Connecting to a TV with an HDMI (High Definition Multimedia Interface) cable
Regarding VIERA Link “HDAVI Control
TM
” function
When connecting with a Panasonic TV (VIERA) or a receiver equipped with the “HDAVI Control” function, linked operations would be possible.
[➡ 36, Linked operations with the TV (VIERA Link “HDAVI Control
TM
”)]
≥Non-HDMI-compliant cables cannot be utilised.
≥It is recommended that you use Panasonic’s HDMI cable.
Recommended part number:
RP-CDHG10 (1.0 m), RP-CDHG15 (1.5 m), RP-CDHG20 (2.0 m), RP-CDHG30 (3.0 m), RP-CDHG50 (5.0 m), etc.
RF
RF
IN
IN
RF
RF
OUT
OUT
AV2
(
EXT
)
AV1
(
TV
)
OPTICAL
DIGI
DIGIT
AL
AL A
UDIO OU
UDIO OUT
(PCM/BITSTREAM)
(PCM/BITSTREAM)
COMPONENT
COMPONENT
VIDEO OUT
VIDEO OUT
S VIDEOVIDEO
R-AUDIO-L
PR
PB
Y
AC IN
OUT
OUTA
V4 I
V4 IN
AV OUT
VHF/UHF
RF IN
2
1 2
4
3
AUDIO IN
R L
VIDEO IN
To the aerial
Television’s rear panel
Aerial cable
RF coaxial cable
(included)
This unit’s rear panel
To household mains socket
(AC 220 to 240 V, 50 Hz)
AC mains lead
(included)
Connect only after all other
connections are complete.
Cooling fan
Other connections
(➡ below, 68)
Audio/Video cable
(included)
Red White Yellow
Red White Yellow
RF
RF
IN
IN
RF
RF
OUT
OUT
AV2
(
EXT
)
A V 1
(
TV
)
OPTICAL
DIGI
DIGI
T
T
AL
AL
A
A
UDIO OU
UDIO OU
T
T
(PCM/BITSTREAM)
(PCM/BITSTREAM)
COMPONENT
COMPONENT
VIDEO OUT
VIDEO OUT
P R
P B
Y
A C IN
S VIDEO VIDEO
R- A UDIO- L
OUT
OUT
A
A
V4 I
V4 I
N
N
HDMI AV OUT
HDMI IN
AV OUT
This unit’s rear panel
HDMI cable
Television’s rear panel
DMREX78&88GN-RQT9088-L_eng.book 8 ページ 2008年4月1日 火曜日 午後6時38分