


English
14
15
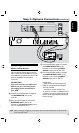
Step 1: Basic Recorder Connections
A
B
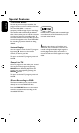
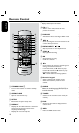
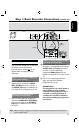
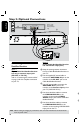
Connecting the antenna
cables
These connections enable you to watch
and record TV programs using this
recorder. If the antenna signal is
connected via a VCR, Cable Box or
Satellite Receiver, ensure that these
devices are turned on in order to watch
or record the cable programs.
l
If you want to connect to a VCR
and/or Cable Box/Satellite Receiver,
see page 18~20 for the complete
connection to your TV.
A
Connect the existing Antenna/Cable TV
signal (or from the Cable Box/Satellite
Receiver {RF OUT or TO TV}) to the
ANTENNA IN jack on the recorder.
B
Use the supplied RF coaxial cable to
connect the ANTENNA OUT jack on
the recorder to the antenna input jack on
your TV (VHF/UHF RF IN.)
Helpful Hint:
– Depending on how you have currently
connected your TV channel (directly from an
off-air antenna or Cable box or VCR), you
will have to disconnect some of the cables
before you make the above connection.
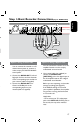
TIPS: Before making or changing any connections, make sure that all the devices are disconnected
from the power outlet.
TIPS: Before making or changing any connections, make sure that all the devices are disconnected
from the power outlet.
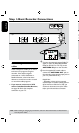
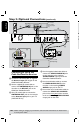
Step 1: Basic Recorder Connections (continued)
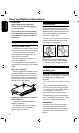
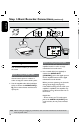
Connecting the video cable
This connection enables you to view the
disc playback from the recorder.
You only need to choose one of the
options below to make your video
connection.
Option 1: Using Video (CVBS) jack
(good picture quality)
l
Use the supplied audio/video cable
(yellow plug) to connect the VIDEO
OUT [CVBS] jack on the recorder to
the VIDEO Input jack (or labeled as A/
V In, Video In or Composite) on the TV.
Option 2: Using S-Video jack
(excellent picture quality)
l
Use an S-video cable (not supplied) to
connect the VIDEO OUT [S-VIDEO]
jack on the recorder to the S-VIDEO
Input jack (or labeled as Y/C or S-VHS)
on the TV.