


38
Special settings for the video recorder
and TV set
This is where you can make various basic settings, e.g.
frequency/channel number display, wide-screen
format, VCR1/VCR2 switching.
!
Switch the TV set on and select the channel number
for the video recorder.
"
Press the button S on the video
recorder.
¤
Select the line "Special settings". Confirm this by
pressing the button _.
$
Die OSD page "SPECIAL SETTINGS" appears on
screen and the line "Frequency/Channel" becomes
active. Select the display "FREQ" or "CHAN".
%
Select the line "16:9". If you have one of the new
TV sets in wide-screen format, you need not make
the setting. Otherwise, select the display "off"
(= screen format "4:3").
&
Use two video recorders with the same remote
control code so that you can switch the remote
control and the corresponding video recorder to
operate the "right" video recorder.
In this connection, read the detailed explanations
in Chapter 8 "Additional functions of your video
recorder" in the section entitled "VCR 1/VCR 2
switching".
/
Each time a button is pressed, whether on the
Videorecorder or on the remote control, it is
confirmed by an audible signal.
This audible signal can be switched off and on.
Select the line "Beeper". Select "off" or "on".
You can make recordings from external picture/sound
sources with this video recorder, for example re-recor-
ding from a camcorder or a second video recorder to
this video recorder.
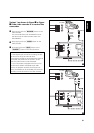
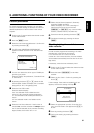
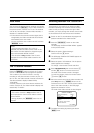
SPECIAL SETTINGS
Channel/Frequency CHAN >
16 :9 on
VCR adress VCR1
Y/C CVBS input/output
Beeper on
Exit - MENU
This video recorder automatically recognises whether a
S-VHS signal (= Y/C-signal) or
a VHS-Signal (= CVBS-signal) is being fed in.
You can also manually choose the input and output
signal of the Scart socket yx
and also the input signal of the Scart socket
cv.
(
Select the "Y/C CVBS input/output" line.
Confirm using the _ button.
)
The OSD page "Y/C CVBS INPUT / OUTPUT"
will appear on the screen, the "External 1" line
is active.
Select the "AUTO", "Y/C" or "CVBS" display.
<:
Select the "External 2" line.
If you have connected a normal VHS video recorder
or VHS camcorder as the playback unit, then leave
the "CVBS" display.
If a S-VHS video recorder or S-VHS camcorder has
been connected, select the "Y/C" display.
If you have connected a playback unit with sepa-
rate RGB outputs, then select the "RGB" display.
<>
Confirm the settings using the K button.
<Y
Press the l button twice to end.
Note:
* In exceptional cases (e.g. when there is not a
standard S-VHS or VHS signal), the colour reproduc-
tion could be distorted when the recording is played
back. If this is the case, make the following setting
in step
)
!
If you have connected a normal VHS video recorder
or VHS camcorder as the playback unit, then select
the "CVBS" display. If a S-VHS video recorder or
S-VHS camcorder has been connected, select the
"Y/C" display.
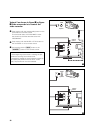
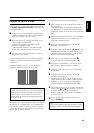
Y/C CVBS INPUT/OUTPUT
Inputs :
External 1 AUTO >
External 2 AUTO
Output :
External 1 CVBS
Confirm - OK