


Connecting up
English
8
En
Watching progressive scan video from the component video outputs
This player can output progressive scan video from the component video output. Compared to
interlace video, progressive scan video effectively doubles the scanning rate of the picture, resulting
in a very stable, flicker-free image.
To set up the player for use with a progressive scan TV, see
Video Output settings
on page 18. When
the player is set to output progressive scan video, the
PRGSVE
indicator lights in the front panel
display.
Important
•
DV-2750/DV-370 only:
When
Component Out
(page 18) is set to
Progressive
, there is no video
output from the
VIDEO OUT
(composite) and
S
(S-video) jacks.
•
DV-2750/DV-370 only:
If you want to display video on more than one monitor simultaneously,
make sure the player is set to
Interlace
.
• If you connect a TV that is not compatible with a progressive scan signal and switch the player
to progressive, you will not be able to see any picture at all. In this case, switch everything off
and reconnect using the supplied video cable (see
Easy connections
on page 7), then switch
back to
Interlace
(see below).
Switching the video output to interlace using the front panel controls
Compatibility of this player with progressive-scan and high-definition TVs
This player is compatible with progressive video Macro Vision System Copy Guard.
Consumers should note that not all high-definition television sets are fully compatible with this
product and may cause artifacts to be displayed in the picture. In case of 525 progressive scan
picture problems, it is recommended that the user switch the connection to the ‘standard definition’
output (Interlace). If there are questions regarding our TV set compatibility with this model, please
contact our customer service center.
This player is compatible with the following Pioneer displays and monitors:
PDP-504HDE, PDP-434HDE
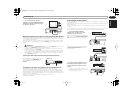
Connecting to an AV receiver
To enjoy multichannel surround sound you need to connect this player to an AV receiver using the
digital audio output.
Model DV-470 has both optical and coaxial digital outputs; models DV-2750 and DV-370 have only a
coaxial-type output.
In addition to a digital connection, we recommend also connecting using the stereo analog
connection.
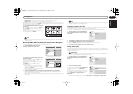
You’ll probably also want to connect a video output to your AV receiver. You can use any of the video
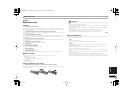
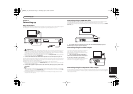
outputs available on this player (the illustration shows a standard (composite) connection).
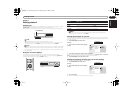
•Use a component video cable (not
supplied) to connect the COMPONENT VIDEO
OUT jacks to a component video input on your
TV, monitor or AV receiver.
Switch the player to standby then, using the front
panel controls, press
STANDBY/ON
while
pressing
to switch the player back to
Interlace
.
DIGITAL AUDIO OUT
S
L
R
P
R
P
B
Y
COAXIAL
COMPONENT VIDEO OUT
AUDIO OUT
VIDEO OUT
TV
COMPONENT
VIDEO IN
DV-2750
DV-370
DV-2750
STANDBY/ON
STANDBY/ON
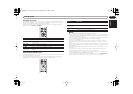
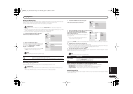
1Connect the DIGITAL AUDIO OUT
COAXIAL jack on this player to a coaxial
digital input on your AV receiver.
Use a coaxial cable (similar to the supplied video
cable) to connect the
COAXIAL DIGITAL AUDIO
OUT
jack to a coaxial input on your AV receiver.
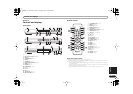
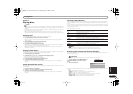
DV-470 only:
You can also use the optical output
(
OPTICAL DIGITAL AUDIO OUT
) to make the
same connection.
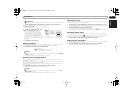
2Connect the analog AUDIO OUT L/R and
VIDEO OUT jacks on this player to a set of
analog audio and video inputs on your AV
receiver.
• You can use the SCART AV connector, or the
S-video or component video jacks to connect
to the AV receiver if you prefer.
DIGITAL AUDIO OUT
S
L
R
P
R
P
B
Y
COAXIAL
COMPONENT VIDEO OUT
AUDIO OUT
VIDEO OUT
AV receiver
DIGITAL IN
(COAXIAL)
DV-2750
DV-370
S
VIDEO OUT
COMPONENT VIDEO OUT
AUDIO OUT
COAXIAL
OPTICAL
DIGITAL AUDIO OUT
VIDEO
OUT
P
R
P
B
Y
AV receiver
DIGITAL IN
(OPTICAL)
DIGITAL IN
(COAXIAL)
L
12
R
DV-470
DIGITAL AUDIO OUT
S
L
R
P
R
P
B
Y
COAXIAL
COMPONENT VIDEO OUT
AUDIO OUT
VIDEO OUT
AV receiver
AUDIO/
VIDEO IN
DV-2750
DV-370
DV370_En_A5New.book Page 8 Thursday, April 1, 2004 6:16 PM