


Chapter 4 65
Using the TV’s Menu System
Picture Presets
Picture Settings
Go Back
2
1
0
Noise Reduction
Color Warmth
Auto Color
5
4
3
Green Stretch
6
Edge Enhancement
7
Contrast Expand
8
Advanced Settings
9
Main Menu
4
Picture Quality
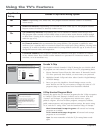
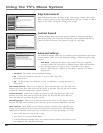
Press 5 or 6 to point to an option, then press OK to select
it. Press 3to return to the menu.
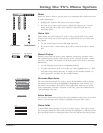
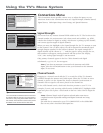
When Auto Color is set to On, it minimizes flesh tone
variations.
A change in this screen is applied to Input 2.
On
Off
Auto Color
Auto Color minimizes the fl esh tone variations of the TV picture. Choose On or
Off, depending on your preference.
Picture Presets
Picture Settings
Go Back
2
1
0
Noise Reduction
Color Warmth
Auto Color
5
4
3
Green Stretch
6
Edge Enhancement
7
Contrast Expand
8
Advanced Settings
9
Main Menu
4
Picture Quality
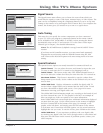
Cool
Normal
Warm
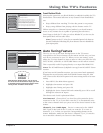
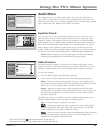
Press 5 or 6 to point to an option, then press OK to select
it. Press 3to return to the menu.
Color Warmth automatically adjusts the "temperature" of
the picture. Cool gives a more blue pallete of picture colors.
Warm gives a more red pallete of picture colors.
A change in this screen is applied to Input 2.
Picture Presets
Picture Settings
Go Back
2
1
0
Noise Reduction
Color Warmth
Auto Color
5
4
3
Green Stretch
6
Edge Enhancement
7
Contrast Expand
8
Advanced Settings
9
Main Menu4Picture Quality
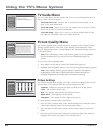
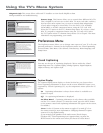
Frame Comb
Adaptive
Off
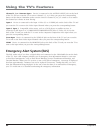
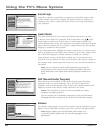
Press 5 or 6 to point to an option, then press OK to select
it. Press 3to return to the menu.
Noise Reduction reduces the appearance of video noise
on composite video sources, giving a smoother picture.
For other sources of video, the Noise Reduction is not active.
The Frame Comb setting provides a constant level of
improvement. In the Adaptive setting additional filtering
is applied, increasing only as the noise content increases.
A change in this screen is applied to Input 2.
Picture Presets
Picture Settings
Go Back
2
1
0
Noise Reduction
Color Warmth
Auto Color
5
4
3
Green Stretch
6
Edge Enhancement
7
Contrast Expand
8
Advanced Settings
9
Main Menu4Picture Quality
Off
Low
High
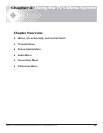
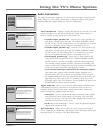
Press 5 or 6 to point to an option, then press OK to select
it. Press 3to return to the menu.
A change in this screen is applied to Input 2.
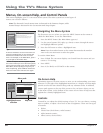
Picture Presets
Picture Presets displays a choice list that lets you select one of the six preset
picture settings: Vibrant (Day), Natural, Cinematic (Night), Videogame,
Professional, and Personal.
Choose your setting based on the degree of lighting in your room. After you
select a preset, the settings listed to the right are adjusted automatically.
If you choose Personal, you can customize each picture quality setting to your
desired level, and a message appears asking if you want to save those settings.
After you’ve saved your personal settings, you can go back into the menu and
select a different picture preset. For example, if you normally use Personal but
want to watch a show in Vibrant (Day) lighting, choose Vibrant (Day), watch
the show, and then afterwards return to your customized settings by choosing
Personal. The PRESETS button on the remote works with Picture Presets. Go to
the Remote chapter for more information.
Color Warmth
Color Warmth automatically adjusts the color temperature of the picture. The
feature lets you set one of three automatic color adjustments:
Cool More blue.
Normal Standard picture color.
Warm More red.
Noise Reduction
Noise Reduction displays a list that lets you set one of the three settings that
allows you to reduce picture “static” or any type of interference. A different
Noise Reduction setting can be stored for each input, but only applies to
components connected to the composite inputs. You can set the Noise Reduction
to Frame Comb, Adaptive, or Off. The settings are explained in the on-screen
help text.
Green Stretch
Green Stretch makes green “greener” and increases the saturation. For example,
nature shows and sporting events are especially enhanced by this feature. The
options are Off, Low, and High.
Picture Presets
Picture Settings
Go Back
2
1
0
Noise Reduction
Color Warmth
Auto Color
5
4
3
Green Stretch
6
Edge Enhancement
7
Contrast Expand
8
Advanced Settings
9
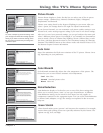
Press 5 or 6 to point to an option, then press OK to select it.
Press 3 to return to the menu.
A change in this screen is applied to Input 3.
Vibrant Day
Natural
Cinematic (Night)
Videogame
Professional
Personal
Contrast 65%
Color 70%
Tint 55%
Black Level 60%
Sharpness 55%
Auto Color On
Color Warmth Cool
Noise Reduction Frame Comb
Green Stretch High
Edge Enhancement Low
Contrast Expand High
Main Menu
4
Picture Quality
Tip
To create a temporary personal setting, make
your changes and when the message appears
asking if you want to save the setting, select
No. The preset is saved until you change the
channel or input.