


44 chapter 3
Using an Internet Connection
Internet Settings
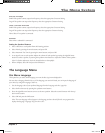
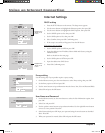
DHCP setting
1. Press the SETUP button on the remote. The Setup menu appears.
2. Use the arrow buttons to highlight the Ethernet option, then press OK.
3. Use the arrow buttons to highlight the DHCP option, then press OK.
4. Set the DHCP option to On, then press OK.
5. Set the DNS option to On, then press OK.
6. Select Confirm, then press OK. Confirming starts.
7. If the setup is successful, an IP appears. Press the OK button.
If the setup is not successful:
1. Set the DHCP option to Off then press OK.
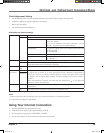
2. Input the addresses into IP address, Subnet Mask and Gateway using the
number buttons.
Refer to the table on the next page.
3. Set the DNS option to Off then press OK.
4. Input the address into DNS Server.
5. Press OK. Confirming starts.
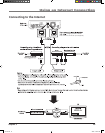
Connections
Playback
(Basic)
Others
DHCP
DHCP
IP Address
Subnet Mask
Gateway
DNS
DNS Server
OK
On
Cancel
0 . 0 . 0 . 0
0 . 0 . 0 . 0
0 . 0 . 0 . 0
0 . 0 . 0 . 0
Confirm
Off
On Off
DHCP
DHCP
IP Address
Subnet Mask
Gateway
DNS
DNS Server
OK
On
Cancel
0 . 0 . 0 . 0
0 . 0 . 0 . 0
0 . 0 . 0 . 0
0 . 0 . 0 . 0
Confirm
Off
On Off
Skipped when
“DHCP” is set
to “On”.
Skipped when
“DHCP” is set
to “On”.
Proxy Setting
Proxy
Server
Port
User
Password
OK Cancel
a
************
On Off
a
0
User information
User
Password
OK Cancel
************
A
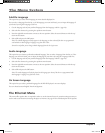
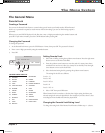
Proxy setting
Use this setting only if your provider requires a proxy setting.
1. On the Ethernet menu, press the arrow buttons to select Proxy setting, then press OK.
2. Set the Proxy option to ON and press OK.
3. Use the arrow buttons to input information into the Server, Port, User and Password fields.
4. Select OK and press the OK button.
User Name and Password
1. On the Ethernet menu, use the arrow buttons to select the User Information option, then
press OK.
2. Select User and press OK.
3. Use the up/down arrow buttons to input letters/numbers. Use the right/left arrow buttons
to move to a new position. Press OK.
4. Select Password and press OK. Input your password using the arrow buttons as described
above. Press OK.
5. When your password is entered, Select OK and press the OK button.
Connections
Playback
(Basic)
Others
DHCP
DHCP
IP Address
Subnet Mask
Gateway
DNS
DNS Server
OK
On
Cancel
0 . 0 . 0 . 0
0 . 0 . 0 . 0
0 . 0 . 0 . 0
0 . 0 . 0 . 0
Confirm
Off
On Off
DHCP
DHCP
IP Address
Subnet Mask
Gateway
DNS
DNS Server
OK
On
Cancel
0 . 0 . 0 . 0
0 . 0 . 0 . 0
0 . 0 . 0 . 0
0 . 0 . 0 . 0
Confirm
Off
On Off
Skipped when
“DHCP” is set
to “On”.
Skipped when
“DHCP” is set
to “On”.
Proxy Setting
Proxy
Server
Port
User
Password
OK Cancel
a
************
On Off
a
0
User information
User
Password
OK Cancel
************
A
internet.indd 44 3/8/06 5:05:57 PM